Search Results: "tore"

7 January 2024

Jonathan McDowell: Free Software Activities for 2023

This year was hard from a personal and work point of view, which impacted the amount of Free Software bits I ended up doing - even when I had the time I often wasn t in the right head space to make progress on things. However writing this annual recap up has been a useful exercise, as I achieved more than I realised. For previous years see 2019, 2020, 2021 + 2022.

Conferences The only Free Software related conference I made it to this year was DebConf23 in Kochi, India. Changes with projects at work meant I couldn t justify anything work related. This year I m planning to make it to FOSDEM, and haven t made a decision on DebConf24 yet.

Debian Most of my contributions to Free software continue to happen within Debian. I started the year working on retrogaming with Kodi on Debian. I got this to a much better state for bookworm, with it being possible to run the bsnes-mercury emulator under Kodi using RetroArch. There are a few other libretro backends available for RetroArch, but Kodi needs some extra controller mappings packaged up first. Plenty of uploads were involved, though some of this was aligning all the dependencies and generally cleaning things up in iterations. I continued to work on a few packages within the Debian Electronics Packaging Team. OpenOCD produced a new release in time for the bookworm release, so I uploaded 0.12.0-1. There were a few minor sigrok cleanups - sigrok 0.3, libsigrokdecode 0.5.3-4 + libsigrok 0.5.2-4 / 0.5.2-5. While I didn t manage to get the work completed I did some renaming of the ESP8266 related packages - gcc-xtensa-lx106 (which saw a 13 upload pre-bookworm) has become gcc-xtensa (with 14) and binutils-xtensa-lx106 has become binutils-xtensa (with 6). Binary packages remain the same, but this is intended to allow for the generation of ESP32 compiler toolchains from the same source. onak saw 0.6.3-1 uploaded to match the upstream release. I also uploaded libgpg-error 1.47-1 (though I can claim no credit for any of the work in preparing the package) to help move things forward on updating gnupg2 in Debian. I NMUed tpm2-pkcs11 1.9.0-0.1 to fix some minor issues pre-bookworm release; I use this package myself to store my SSH key within my laptop TPM, so I care about it being in a decent state. sg3-utils also saw a bit of love with 1.46-2 + 1.46-3 - I don t work in the storage space these days, but I m still listed as an uploaded and there was an RC bug around the library package naming that I was qualified to fix and test pre-bookworm. Related to my retroarch work I sponsored uploads of mgba for Ryan Tandy: 0.10.0+dfsg-1, 0.10.0+dfsg-2, 0.10.1+dfsg-1, 0.10.2+dfsg-1, mgba 0.10.1+dfsg-1+deb12u1. As part of the Data Protection Team I responded to various inbound queries to that team, both from project members and those external to the project. I continue to keep an eye on Debian New Members, even though I m mostly inactive as an application manager - we generally seem to have enough available recently. Mostly my involvement is via Front Desk activities, helping out with queries to the team alias, and contributing to internal discussions as well as our panel at DebConf23. Finally the 3 month rotation for Debian Keyring continues to operate smoothly. I dealt with 2023.03.24, 2023.06.26, 2023.06.29, 2023.09.10, 2023.09.24 + 2023.12.24.

Linux I had a few minor patches accepted to the kernel this year. A pair of safexcel cleanups (improved error logging for firmware load fail and cleanup on load failure) came out of upgrading the kernel running on my RB5009. The rest were related to my work on repurposing my C.H.I.P.. The AXP209 driver needed extended to support GPIO3 (with associated DT schema update). That allowed Bluetooth to be enabled. Adding the AXP209 internal temperature ADC as an iio-hwmon node means it can be tracked using the normal sensor monitoring framework. And finally I added the pinmux settings for mmc2, which I use to support an external microSD slot on my C.H.I.P.

Personal projects 2023 saw another minor release of onak, 0.6.3, which resulted in a corresponding Debian upload (0.6.3-1). It has a couple of bug fixes (including a particularly annoying, if minor, one around systemd socket activation that felt very satisfying to get to the bottom of), but I still lack the time to do any of the major changes I would like to. I wrote listadmin3 to allow easy manipulation of moderation queues for Mailman3. It s basic, but it s drastically improved my timeliness on dealing with held messages.

4 January 2024

Michael Ablassmeier: Migrating a system to Hetzner cloud using REAR and kexec

I needed to migrate an existing system to an Hetzner cloud VPS. While it is possible to attach KVM consoles and custom ISO images to dedicated servers, i didn t find any way to do so with regular cloud instances. For system migrations i usually use REAR, which has never failed me. (and also has saved my ass during recovery multiple times). It s an awesome utility! It s possible to do this using the Hetzner recovery console too, but using REAR is very convenient here, because it handles things like re-creating the partition layout and network settings automatically! The steps are:

Example To create a rescue image on the source system:
apt install rear
echo OUTPUT=ISO > /etc/rear/local.conf
rear mkrescue -v
[..]
Wrote ISO image: /var/lib/rear/output/rear-debian12.iso (185M)
My source system had a 128 GB disk, so i registered an instance on Hetzner cloud with greater disk size to make things easier: image Now copy the ISO image to the newly created instance and extract its data:
 apt install kexec-tools
 scp rear-debian12.iso root@49.13.193.226:/tmp/
 modprobe loop
 mount -o loop rear-debian12.iso /mnt/
 cp /mnt/isolinux/kernel /tmp/
 cp /mnt/isolinux/initrd.cgz /tmp/
Install kexec if not installed already:
 apt install kexec-tools
Note down the current gateway configuration, this is required later on to make the REAR recovery console reachable via SSH:
root@testme:~# ip route
default via 172.31.1.1 dev eth0
172.31.1.1 dev eth0 scope link
Reboot the running VPS instance into the REAR recovery image using somewhat the same kernel cmdline:
root@testme:~# cat /proc/cmdline
BOOT_IMAGE=/boot/vmlinuz-6.1.0-13-amd64 root=UUID=5174a81e-5897-47ca-8fe4-9cd19dc678c4 ro consoleblank=0 systemd.show_status=true console=tty1 console=ttyS0
kexec --initrd /tmp/initrd.cgz --command-line="consoleblank=0 systemd.show_status=true console=tty1 console=ttyS0" /tmp/kernel
Connection to 49.13.193.226 closed by remote host.
Connection to 49.13.193.226 closed
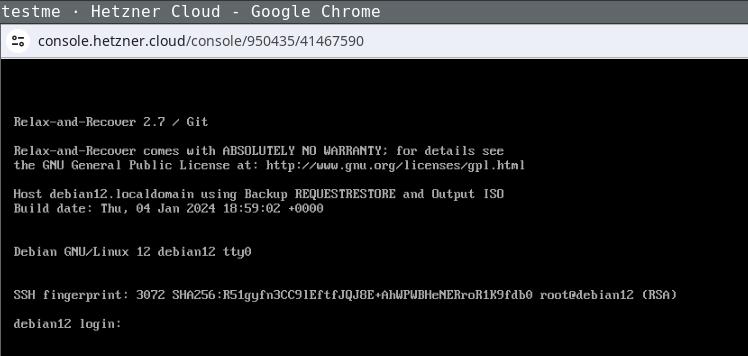
Now watch the system on the Console booting into the REAR system: image Login the recovery console (root without password) and fix its default route to make it reachable:
ip addr
[..]
2: enp1s0
..
$ ip route add 172.31.1.1 dev enp1s0
$ ip route add default via 172.31.1.1
ping 49.13.193.226
64 bytes from 49.13.193.226: icmp_seq=83 ttl=52 time=27.7 ms
The network configuration might differ, the source system in this example used DHCP, as the target does. If REAR detects changed static network configuration it guides you through the setup pretty nicely. Login via SSH (REAR will store your ssh public keys in the image) and start the recovery process, follow the steps as suggested by REAR:
ssh -l root 49.13.193.226
Welcome to Relax-and-Recover. Run "rear recover" to restore your system !
RESCUE debian12:~ # rear recover
Relax-and-Recover 2.7 / Git
Running rear recover (PID 673 date 2024-01-04 19:20:22)
Using log file: /var/log/rear/rear-debian12.log
Running workflow recover within the ReaR rescue/recovery system
Will do driver migration (recreating initramfs/initrd)
Comparing disks
Device vda does not exist (manual configuration needed)
Switching to manual disk layout configuration (GiB sizes rounded down to integer)
/dev/vda had size 137438953472 (128 GiB) but it does no longer exist
/dev/sda was not used on the original system and has now 163842097152 (152 GiB)
Original disk /dev/vda does not exist (with same size) in the target system
Using /dev/sda (the only available of the disks) for recreating /dev/vda
Current disk mapping table (source => target):
  /dev/vda => /dev/sda
Confirm or edit the disk mapping
1) Confirm disk mapping and continue 'rear recover'
[..]
User confirmed recreated disk layout
[..]
This step re-recreates your original disk layout and mounts it to /mnt/local/ (this example uses a pretty lame layout, but usually REAR will handle things like lvm/btrfs just nicely):
mount
/dev/sda3 on /mnt/local type ext4 (rw,relatime,errors=remount-ro)
/dev/sda1 on /mnt/local/boot type ext4 (rw,relatime)
Now clone your source systems data to /mnt/local/ with whatever utility you like to use and exit the recovery step. After confirming everything went well, REAR will setup the bootloader (and all other config details like fstab entries and adjusted network configuration) for you as required:
rear> exit
Did you restore the backup to /mnt/local ? Are you ready to continue recovery ? yes
User confirmed restored files
Updated initramfs with new drivers for this system.
Skip installing GRUB Legacy boot loader because GRUB 2 is installed (grub-probe or grub2-probe exist).
Installing GRUB2 boot loader...
Determining where to install GRUB2 (no GRUB2_INSTALL_DEVICES specified)
Found possible boot disk /dev/sda - installing GRUB2 there
Finished 'recover'. The target system is mounted at '/mnt/local'.
Exiting rear recover (PID 7103) and its descendant processes ...
Running exit tasks
Now reboot the recovery console and watch it boot into your target systems configuration: image Being able to use this procedure for complete disaster recovery within Hetzner cloud VPS (using off-site backups) gives me a better feeling, too.

3 January 2024

John Goerzen: Live Migrating from Raspberry Pi OS bullseye to Debian bookworm

I ve been getting annoyed with Raspberry Pi OS (Raspbian) for years now. It s a fork of Debian, but manages to omit some of the most useful things. So I ve decided to migrate all of my Pis to run pure Debian. These are my reasons:
  1. Raspberry Pi OS has, for years now, specified that there is no upgrade path. That is, to get to a newer major release, it s a reinstall. While I have sometimes worked around this, for a device that is frequently installed in hard-to-reach locations, this is even more important than usual. It s common for me to upgrade machines for a decade or more across Debian releases and there s no reason that it should be so much more difficult with Raspbian.
  2. As I noted in Consider Security First, the security situation for Raspberry Pi OS isn t as good as it is with Debian.
  3. Raspbian lags behind Debian often times by 6 months or more for major releases, and days or weeks for bug fixes and security patches.
  4. Raspbian has no direct backports support, though Raspberry Pi 3 and above can use Debian s backports (per my instructions as Installing Debian Backports on Raspberry Pi)
  5. Raspbian uses a custom kernel without initramfs support
It turns out it is actually possible to do an in-place migration from Raspberry Pi OS bullseye to Debian bookworm. Here I will describe how. Even if you don t have a Raspberry Pi, this might still be instructive on how Raspbian and Debian packages work.

WARNINGS Before continuing, back up your system. This process isn t for the neophyte and it is entirely possible to mess up your boot device to the point that you have to do a fresh install to get your Pi to boot. This isn t a supported process at all.

Architecture Confusion Debian has three ARM-based architectures:
  • armel, for the lowest-end 32-bit ARM devices without hardware floating point support
  • armhf, for the higher-end 32-bit ARM devices with hardware float (hence hf )
  • arm64, for 64-bit ARM devices (which all have hardware float)
Although the Raspberry Pi 0 and 1 do support hardware float, they lack support for other CPU features that Debian s armhf architecture assumes. Therefore, the Raspberry Pi 0 and 1 could only run Debian s armel architecture. Raspberry Pi 3 and above are capable of running 64-bit, and can run both armhf and arm64. Prior to the release of the Raspberry Pi 5 / Raspbian bookworm, Raspbian only shipped the armhf architecture. Well, it was an architecture they called armhf, but it was different from Debian s armhf in that everything was recompiled to work with the more limited set of features on the earlier Raspberry Pi boards. It was really somewhere between Debian s armel and armhf archs. You could run Debian armel on those, but it would run more slowly, due to doing floating point calculations without hardware support. Debian s raspi FAQ goes into this a bit. What I am going to describe here is going from Raspbian armhf to Debian armhf with a 64-bit kernel. Therefore, it will only work with Raspberry Pi 3 and above. It may theoretically be possible to take a Raspberry Pi 2 to Debian armhf with a 32-bit kernel, but I haven t tried this and it may be more difficult. I have seen conflicting information on whether armhf really works on a Pi 2. (If you do try it on a Pi 2, ignore everything about arm64 and 64-bit kernels below, and just go with the linux-image-armmp-lpae kernel per the ARMMP page) There is another wrinkle: Debian doesn t support running 32-bit ARM kernels on 64-bit ARM CPUs, though it does support running a 32-bit userland on them. So we will wind up with a system with kernel packages from arm64 and everything else from armhf. This is a perfectly valid configuration as the arm64 like x86_64 is multiarch (that is, the CPU can natively execute both the 32-bit and 64-bit instructions). (It is theoretically possible to crossgrade a system from 32-bit to 64-bit userland, but that felt like a rather heavy lift for dubious benefit on a Pi; nevertheless, if you want to make this process even more complicated, refer to the CrossGrading page.)

Prerequisites and Limitations In addition to the need for a Raspberry Pi 3 or above in order for this to work, there are a few other things to mention. If you are using the GPIO features of the Pi, I don t know if those work with Debian. I think Raspberry Pi OS modified the desktop environment more than other components. All of my Pis are headless, so I don t know if this process will work if you use a desktop environment. I am assuming you are booting from a MicroSD card as is typical in the Raspberry Pi world. The Pi s firmware looks for a FAT partition (MBR type 0x0c) and looks within it for boot information. Depending on how long ago you first installed an OS on your Pi, your /boot may be too small for Debian. Use df -h /boot to see how big it is. I recommend 200MB at minimum. If your /boot is smaller than that, stop now (or use some other system to shrink your root filesystem and rearrange your partitions; I ve done this, but it s outside the scope of this article.) You need to have stable power. Once you begin this process, your pi will mostly be left in a non-bootable state until you finish. (You did make a backup, right?)

Basic idea The basic idea here is that since bookworm has almost entirely newer packages then bullseye, we can just switch over to it and let the Debian packages replace the Raspbian ones as they are upgraded. Well, it s not quite that easy, but that s the main idea.

Preparation First, make a backup. Even an image of your MicroSD card might be nice. OK, I think I ve said that enough now. It would be a good idea to have a HDMI cable (with the appropriate size of connector for your particular Pi board) and a HDMI display handy so you can troubleshoot any bootup issues with a console.

Preparation: access The Raspberry Pi OS by default sets up a user named pi that can use sudo to gain root without a password. I think this is an insecure practice, but assuming you haven t changed it, you will need to ensure it still works once you move to Debian. Raspberry Pi OS had a patch in their sudo package to enable it, and that will be removed when Debian s sudo package is installed. So, put this in /etc/sudoers.d/010_picompat:
pi ALL=(ALL) NOPASSWD: ALL
Also, there may be no password set for the root account. It would be a good idea to set one; it makes it easier to log in at the console. Use the passwd command as root to do so.

Preparation: bluetooth Debian doesn t correctly identify the Bluetooth hardware address. You can save it off to a file by running hcitool dev > /root/bluetooth-from-raspbian.txt. I don t use Bluetooth, but this should let you develop a script to bring it up properly.

Preparation: Debian archive keyring You will next need to install Debian s archive keyring so that apt can authenticate packages from Debian. Go to the bookworm download page for debian-archive-keyring and copy the URL for one of the files, then download it on the pi. For instance:
wget http://http.us.debian.org/debian/pool/main/d/debian-archive-keyring/debian-archive-keyring_2023.3+deb12u1_all.deb
Use sha256sum to verify the checksum of the downloaded file, comparing it to the package page on the Debian site. Now, you ll install it with:
dpkg -i debian-archive-keyring_2023.3+deb12u1_all.deb

Package first steps From here on, we are making modifications to the system that can leave it in a non-bootable state. Examine /etc/apt/sources.list and all the files in /etc/apt/sources.list.d. Most likely you will want to delete or comment out all lines in all files there. Replace them with something like:
deb http://deb.debian.org/debian/ bookworm main non-free-firmware contrib non-free
deb http://security.debian.org/debian-security bookworm-security main non-free-firmware contrib non-free
deb https://deb.debian.org/debian bookworm-backports main non-free-firmware contrib non-free
(you might leave off contrib and non-free depending on your needs) Now, we re going to tell it that we ll support arm64 packages:
dpkg --add-architecture arm64
And finally, download the bookworm package lists:
apt-get update
If there are any errors from that command, fix them and don t proceed until you have a clean run of apt-get update.

Moving /boot to /boot/firmware The boot FAT partition I mentioned above is mounted at /boot by Raspberry Pi OS, but Debian s scripts assume it will be at /boot/firmware. We need to fix this. First:
umount /boot
mkdir /boot/firmware
Now, edit fstab and change the reference to /boot to be to /boot/firmware. Now:
mount -v /boot/firmware
cd /boot/firmware
mv -vi * ..
This mounts the filesystem at the new location, and moves all its contents back to where apt believes it should be. Debian s packages will populate /boot/firmware later.

Installing the first packages Now we start by installing the first of the needed packages. Eventually we will wind up with roughly the same set Debian uses.
apt-get install linux-image-arm64
apt-get install firmware-brcm80211=20230210-5
apt-get install raspi-firmware
If you get errors relating to firmware-brcm80211 from any commands, run that install firmware-brcm80211 command and then proceed. There are a few packages that Raspbian marked as newer than the version in bookworm (whether or not they really are), and that s one of them.

Configuring the bootloader We need to configure a few things in /etc/default/raspi-firmware before proceeding. Edit that file. First, uncomment (or add) a line like this:
KERNEL_ARCH="arm64"
Next, in /boot/cmdline.txt you can find your old Raspbian boot command line. It will say something like:
root=PARTUUID=...
Save off the bit starting with PARTUUID. Back in /etc/default/raspi-firmware, set a line like this:
ROOTPART=PARTUUID=abcdef00
(substituting your real value for abcdef00). This is necessary because the microSD card device name often changes from /dev/mmcblk0 to /dev/mmcblk1 when switching to Debian s kernel. raspi-firmware will encode the current device name in /boot/firmware/cmdline.txt by default, which will be wrong once you boot into Debian s kernel. The PARTUUID approach lets it work regardless of the device name.

Purging the Raspbian kernel Run:
dpkg --purge raspberrypi-kernel

Upgrading the system At this point, we are going to run the procedure beginning at section 4.4.3 of the Debian release notes. Generally, you will do:
apt-get -u upgrade
apt full-upgrade
Fix any errors at each step before proceeding to the next. Now, to remove some cruft, run:
apt-get --purge autoremove
Inspect the list to make sure nothing important isn t going to be removed.

Removing Raspbian cruft You can list some of the cruft with:
apt list '~o'
And remove it with:
apt purge '~o'
I also don t run Bluetooth, and it seemed to sometimes hang on boot becuase I didn t bother to fix it, so I did:
apt-get --purge remove bluez

Installing some packages This makes sure some basic Debian infrastructure is available:
apt-get install wpasupplicant parted dosfstools wireless-tools iw alsa-tools
apt-get --purge autoremove

Installing firmware Now run:
apt-get install firmware-linux

Resolving firmware package version issues If it gives an error about the installed version of a package, you may need to force it to the bookworm version. For me, this often happened with firmware-atheros, firmware-libertas, and firmware-realtek. Here s how to resolve it, with firmware-realtek as an example:
  1. Go to https://packages.debian.org/PACKAGENAME for instance, https://packages.debian.org/firmware-realtek. Note the version number in bookworm in this case, 20230210-5.
  2. Now, you will force the installation of that package at that version:
    apt-get install firmware-realtek=20230210-5
    
  3. Repeat with every conflicting package until done.
  4. Rerun apt-get install firmware-linux and make sure it runs cleanly.
Also, in the end you should be able to:
apt-get install firmware-atheros firmware-libertas firmware-realtek firmware-linux

Dealing with other Raspbian packages The Debian release notes discuss removing non-Debian packages. There will still be a few of those. Run:
apt list '?narrow(?installed, ?not(?origin(Debian)))'
Deal with them; mostly you will need to force the installation of a bookworm version using the procedure in the section Resolving firmware package version issues above (even if it s not for a firmware package). For non-firmware packages, you might possibly want to add --mark-auto to your apt-get install command line to allow the package to be autoremoved later if the things depending on it go away. If you aren t going to use Bluetooth, I recommend apt-get --purge remove bluez as well. Sometimes it can hang at boot if you don t fix it up as described above.

Set up networking We ll be switching to the Debian method of networking, so we ll create some files in /etc/network/interfaces.d. First, eth0 should look like this:
allow-hotplug eth0
iface eth0 inet dhcp
iface eth0 inet6 auto
And wlan0 should look like this:
allow-hotplug wlan0
iface wlan0 inet dhcp
    wpa-conf /etc/wpa_supplicant/wpa_supplicant.conf
Raspbian is inconsistent about using eth0/wlan0 or renamed interface. Run ifconfig or ip addr. If you see a long-named interface such as enx<something> or wlp<something>, copy the eth0 file to the one named after the enx interface, or the wlan0 file to the one named after the wlp interface, and edit the internal references to eth0/wlan0 in this new file to name the long interface name. If using wifi, verify that your SSIDs and passwords are in /etc/wpa_supplicant/wpa_supplicant.conf. It should have lines like:
network= 
   ssid="NetworkName"
   psk="passwordHere"
 
(This is where Raspberry Pi OS put them).

Deal with DHCP Raspberry Pi OS used dhcpcd, whereas bookworm normally uses isc-dhcp-client. Verify the system is in the correct state:
apt-get install isc-dhcp-client
apt-get --purge remove dhcpcd dhcpcd-base dhcpcd5 dhcpcd-dbus

Set up LEDs To set up the LEDs to trigger on MicroSD activity as they did with Raspbian, follow the Debian instructions. Run apt-get install sysfsutils. Then put this in a file at /etc/sysfs.d/local-raspi-leds.conf:
class/leds/ACT/brightness = 1
class/leds/ACT/trigger = mmc1

Prepare for boot To make sure all the /boot/firmware files are updated, run update-initramfs -u. Verify that root in /boot/firmware/cmdline.txt references the PARTUUID as appropriate. Verify that /boot/firmware/config.txt contains the lines arm_64bit=1 and upstream_kernel=1. If not, go back to the section on modifying /etc/default/raspi-firmware and fix it up.

The moment arrives Cross your fingers and try rebooting into your Debian system:
reboot
For some reason, I found that the first boot into Debian seems to hang for 30-60 seconds during bootstrap. I m not sure why; don t panic if that happens. It may be necessary to power cycle the Pi for this boot.

Troubleshooting If things don t work out, hook up the Pi to a HDMI display and see what s up. If I anticipated a particular problem, I would have documented it here (a lot of the things I documented here are because I ran into them!) So I can t give specific advice other than to watch boot messages on the console. If you don t even get kernel messages going, then there is some problem with your partition table or /boot/firmware FAT partition. Otherwise, you ve at least got the kernel going and can troubleshoot like usual from there.

31 December 2023

Petter Reinholdtsen: VLC bittorrent plugin still going strong, new upload 2.14-4

The other day I uploaded a new version of the VLC bittorrent plugin to Debian, version 2.14-4, to fix a few packaging issues. This plugin extend VLC allowing it to stream videos directly from a bittorrent source using both torrent files and magnet links, as easy as using a HTTP or local file source. I believe such protocol support is a vital feature in VLC, allowing efficient streaming from sources such at the 11 million movies in the Internet Archive. Bittorrent is one of the most efficient content distribution protocols on the Internet, without centralised control, and should be used more. The new version is now both in Debian Unstable and Testing, as well as Ubuntu. While looking after the package, I decided to ask the VLC upstream community if there was any hope to get Bittorrent support into the official VLC program, and was very happy to learn that someone is already working on it. I hope we can see some fruits of that labour next year, but do not hold my breath. In the mean time we can use the plugin, which is already installed by 0.23 percent of the Debian population according to popularity-contest. It could use a new upstream release, and I hope the upstream developer soon find time to polish it even more. It is worth noting that the plugin store the downloaded files in ~/Downloads/vlc-bittorrent/, which can quickly fill up the user home directory during use. Users of the plugin should keep an eye with disk usage when streaming a bittorrent source. As usual, if you use Bitcoin and want to show your support of my activities, please send Bitcoin donations to my address 15oWEoG9dUPovwmUL9KWAnYRtNJEkP1u1b.

27 December 2023

David Bremner: Generating links to a web IDE from org-beamer

The Emacs part is superceded by a cleaner approach I the upcoming term I want to use KC Lu's web based stacker tool. The key point is that it takes (small) programs encoded as part of the url. Yesterday I spent some time integrating it into my existing org-beamer workflow. In my init.el I have
(defun org-babel-execute:stacker (body params)
  (let* ((table '(? ?\n ?: ?/ ?? ?# ?[ ?] ?@ ?! ?$ ?& ??
                    ?( ?) ?* ?+ ?, ?= ?%))
         (slug (org-link-encode body table))
         (simplified (replace-regexp-in-string "[%]20" "+" slug nil 'literal)))
    (format "\\stackerlink %s " simplified)))
This means that when I "execute" the block below with C-c C-c, it updates the link, which is then embedded in the slides.
#+begin_src stacker :results value latex :exports both
  (deffun (f x)
    (let ([y 2])
      (+ x y)))
  (f 7)
#+end_src
#+RESULTS:
#+begin_export latex
\stackerlink %28deffun+%28f+x%29%0A++%28let+%28%5By+2%5D%29%0A++++%28%2B+x+y%29%29%29%0A%28f+7%29 
#+end_export
The \stackerlink macro is probably fancier than needed. One could just use \href from hyperref.sty, but I wanted to match the appearence of other links in my documents (buttons in the margins). This is based on a now lost answer from stackoverflow.com; I think it wasn't this one, but you get the main idea: use \hyper@normalise.
\makeatletter
% define \stacker@base appropriately
\DeclareRobustCommand* \stackerlink \hyper@normalise\stackerlink@ 
\def\stackerlink@#1 %
  \begin tikzpicture [overlay]%
    \coordinate (here) at (0,0);%
    \draw (current page.south west  - here)%
    node[xshift=2ex,yshift=3.5ex,fill=magenta,inner sep=1pt]%
     \hyper@linkurl \tiny\textcolor white stacker \stacker@base?program=#1 ; %
  \end tikzpicture 
\makeatother

25 December 2023

Sergio Talens-Oliag: GitLab CI/CD Tips: Automatic Versioning Using semantic-release

This post describes how I m using semantic-release on gitlab-ci to manage versioning automatically for different kinds of projects following a simple workflow (a develop branch where changes are added or merged to test new versions, a temporary release/#.#.# to generate the release candidate versions and a main branch where the final versions are published).

What is semantic-releaseIt is a Node.js application designed to manage project versioning information on Git Repositories using a Continuous integration system (in this post we will use gitlab-ci)

How does it workBy default semantic-release uses semver for versioning (release versions use the format MAJOR.MINOR.PATCH) and commit messages are parsed to determine the next version number to publish. If after analyzing the commits the version number has to be changed, the command updates the files we tell it to (i.e. the package.json file for nodejs projects and possibly a CHANGELOG.md file), creates a new commit with the changed files, creates a tag with the new version and pushes the changes to the repository. When running on a CI/CD system we usually generate the artifacts related to a release (a package, a container image, etc.) from the tag, as it includes the right version number and usually has passed all the required tests (it is a good idea to run the tests again in any case, as someone could create a tag manually or we could run extra jobs when building the final assets if they fail it is not a big issue anyway, numbers are cheap and infinite, so we can skip releases if needed).

Commit messages and versioningThe commit messages must follow a known format, the default module used to analyze them uses the angular git commit guidelines, but I prefer the conventional commits one, mainly because it s a lot easier to use when you want to update the MAJOR version. The commit message format used must be:
<type>(optional scope): <description>
[optional body]
[optional footer(s)]
The system supports three types of branches: release, maintenance and pre-release, but for now I m not using maintenance ones. The branches I use and their types are:
  • main as release branch (final versions are published from there)
  • develop as pre release branch (used to publish development and testing versions with the format #.#.#-SNAPSHOT.#)
  • release/#.#.# as pre release branches (they are created from develop to publish release candidate versions with the format #.#.#-rc.# and once they are merged with main they are deleted)
On the release branch (main) the version number is updated as follows:
  1. The MAJOR number is incremented if a commit with a BREAKING CHANGE: footer or an exclamation (!) after the type/scope is found in the list of commits found since the last version change (it looks for tags on the same branch).
  2. The MINOR number is incremented if the MAJOR number is not going to be changed and there is a commit with type feat in the commits found since the last version change.
  3. The PATCH number is incremented if neither the MAJOR nor the MINOR numbers are going to be changed and there is a commit with type fix in the the commits found since the last version change.
On the pre release branches (develop and release/#.#.#) the version and pre release numbers are always calculated from the last published version available on the branch (i. e. if we published version 1.3.2 on main we need to have the commit with that tag on the develop or release/#.#.# branch to get right what will be the next version). The version number is updated as follows:
  1. The MAJOR number is incremented if a commit with a BREAKING CHANGE: footer or an exclamation (!) after the type/scope is found in the list of commits found since the last released version.In our example it was 1.3.2 and the version is updated to 2.0.0-SNAPSHOT.1 or 2.0.0-rc.1 depending on the branch.
  2. The MINOR number is incremented if the MAJOR number is not going to be changed and there is a commit with type feat in the commits found since the last released version.In our example the release was 1.3.2 and the version is updated to 1.4.0-SNAPSHOT.1 or 1.4.0-rc.1 depending on the branch.
  3. The PATCH number is incremented if neither the MAJOR nor the MINOR numbers are going to be changed and there is a commit with type fix in the the commits found since the last version change.In our example the release was 1.3.2 and the version is updated to 1.3.3-SNAPSHOT.1 or 1.3.3-rc.1 depending on the branch.
  4. The pre release number is incremented if the MAJOR, MINOR and PATCH numbers are not going to be changed but there is a commit that would otherwise update the version (i.e. a fix on 1.3.3-SNAPSHOT.1 will set the version to 1.3.3-SNAPSHOT.2, a fix or feat on 1.4.0-rc.1 will set the version to 1.4.0-rc.2 an so on).

How do we manage its configurationAlthough the system is designed to work with nodejs projects, it can be used with multiple programming languages and project types. For nodejs projects the usual place to put the configuration is the project s package.json, but I prefer to use the .releaserc file instead. As I use a common set of CI templates, instead of using a .releaserc on each project I generate it on the fly on the jobs that need it, replacing values related to the project type and the current branch on a template using the tmpl command (lately I use a branch of my own fork while I wait for some feedback from upstream, as you will see on the Dockerfile).

Container used to run itAs we run the command on a gitlab-ci job we use the image built from the following Dockerfile:
Dockerfile
# Semantic release image
FROM golang:alpine AS tmpl-builder
#RUN go install github.com/krakozaure/tmpl@v0.4.0
RUN go install github.com/sto/tmpl@v0.4.0-sto.2
FROM node:lts-alpine
COPY --from=tmpl-builder /go/bin/tmpl /usr/local/bin/tmpl
RUN apk update &&\
  apk upgrade &&\
  apk add curl git jq openssh-keygen yq zip &&\
  npm install --location=global\
    conventional-changelog-conventionalcommits@6.1.0\
    @qiwi/multi-semantic-release@7.0.0\
    semantic-release@21.0.7\
    @semantic-release/changelog@6.0.3\
    semantic-release-export-data@1.0.1\
    @semantic-release/git@10.0.1\
    @semantic-release/gitlab@9.5.1\
    @semantic-release/release-notes-generator@11.0.4\
    semantic-release-replace-plugin@1.2.7\
    semver@7.5.4\
  &&\
  rm -rf /var/cache/apk/*
CMD ["/bin/sh"]

How and when is it executedThe job that runs semantic-release is executed when new commits are added to the develop, release/#.#.# or main branches (basically when something is merged or pushed) and after all tests have passed (we don t want to create a new version that does not compile or passes at least the unit tests). The job is something like the following:
semantic_release:
  image: $SEMANTIC_RELEASE_IMAGE
  rules:
    - if: '$CI_COMMIT_BRANCH =~ /^(develop main release\/\d+.\d+.\d+)$/'
      when: always
  stage: release
  before_script:
    - echo "Loading scripts.sh"
    - . $ASSETS_DIR/scripts.sh
  script:
    - sr_gen_releaserc_json
    - git_push_setup
    - semantic-release
Where the SEMANTIC_RELEASE_IMAGE variable contains the URI of the image built using the Dockerfile above and the sr_gen_releaserc_json and git_push_setup are functions defined on the $ASSETS_DIR/scripts.sh file:
  • The sr_gen_releaserc_json function generates the .releaserc.json file using the tmpl command.
  • The git_push_setup function configures git to allow pushing changes to the repository with the semantic-release command, optionally signing them with a SSH key.

The sr_gen_releaserc_json functionThe code for the sr_gen_releaserc_json function is the following:
sr_gen_releaserc_json()
 
  # Use nodejs as default project_type
  project_type="$ PROJECT_TYPE:-nodejs "
  # REGEX to match the rc_branch name
  rc_branch_regex='^release\/[0-9]\+\.[0-9]\+\.[0-9]\+$'
  # PATHS on the local ASSETS_DIR
  assets_dir="$ CI_PROJECT_DIR /$ ASSETS_DIR "
  sr_local_plugin="$ assets_dir /local-plugin.cjs"
  releaserc_tmpl="$ assets_dir /releaserc.json.tmpl"
  pipeline_runtime_values_yaml="/tmp/releaserc_values.yaml"
  pipeline_values_yaml="$ assets_dir /values_$ project_type _project.yaml"
  # Destination PATH
  releaserc_json=".releaserc.json"
  # Create an empty pipeline_values_yaml if missing
  test -f "$pipeline_values_yaml"   : >"$pipeline_values_yaml"
  # Create the pipeline_runtime_values_yaml file
  echo "branch: $ CI_COMMIT_BRANCH " >"$pipeline_runtime_values_yaml"
  echo "gitlab_url: $ CI_SERVER_URL " >"$pipeline_runtime_values_yaml"
  # Add the rc_branch name if we are on an rc_branch
  if [ "$(echo "$CI_COMMIT_BRANCH"   sed -ne "/$rc_branch_regex/ p ")" ]; then
    echo "rc_branch: $ CI_COMMIT_BRANCH " >>"$pipeline_runtime_values_yaml"
  elif [ "$(echo "$CI_MERGE_REQUEST_SOURCE_BRANCH_NAME"  
      sed -ne "/$rc_branch_regex/ p ")" ]; then
    echo "rc_branch: $ CI_MERGE_REQUEST_SOURCE_BRANCH_NAME " \
      >>"$pipeline_runtime_values_yaml"
  fi
  echo "sr_local_plugin: $ sr_local_plugin " >>"$pipeline_runtime_values_yaml"
  # Create the releaserc_json file
  tmpl -f "$pipeline_runtime_values_yaml" -f "$pipeline_values_yaml" \
    "$releaserc_tmpl"   jq . >"$releaserc_json"
  # Remove the pipeline_runtime_values_yaml file
  rm -f "$pipeline_runtime_values_yaml"
  # Print the releaserc_json file
  print_file_collapsed "$releaserc_json"
  # --*-- BEG: NOTE --*--
  # Rename the package.json to ignore it when calling semantic release.
  # The idea is that the local-plugin renames it back on the first step of the
  # semantic-release process.
  # --*-- END: NOTE --*--
  if [ -f "package.json" ]; then
    echo "Renaming 'package.json' to 'package.json_disabled'"
    mv "package.json" "package.json_disabled"
  fi
 
Almost all the variables used on the function are defined by gitlab except the ASSETS_DIR and PROJECT_TYPE; in the complete pipelines the ASSETS_DIR is defined on a common file included by all the pipelines and the project type is defined on the .gitlab-ci.yml file of each project. If you review the code you will see that the file processed by the tmpl command is named releaserc.json.tmpl, its contents are shown here:
 
  "plugins": [
     - if .sr_local_plugin  
    "  .sr_local_plugin  ",
     - end  
    [
      "@semantic-release/commit-analyzer",
       
        "preset": "conventionalcommits",
        "releaseRules": [
            "breaking": true, "release": "major"  ,
            "revert": true, "release": "patch"  ,
            "type": "feat", "release": "minor"  ,
            "type": "fix", "release": "patch"  ,
            "type": "perf", "release": "patch"  
        ]
       
    ],
     - if .replacements  
    [
      "semantic-release-replace-plugin",
        "replacements":   .replacements   toJson    
    ],
     - end  
    "@semantic-release/release-notes-generator",
     - if eq .branch "main"  
    [
      "@semantic-release/changelog",
        "changelogFile": "CHANGELOG.md", "changelogTitle": "# Changelog"  
    ],
     - end  
    [
      "@semantic-release/git",
       
        "assets":   if .assets   .assets   toJson   else  []  end  ,
        "message": "ci(release): v$ nextRelease.version \n\n$ nextRelease.notes "
       
    ],
    [
      "@semantic-release/gitlab",
        "gitlabUrl": "  .gitlab_url  ", "successComment": false  
    ]
  ],
  "branches": [
      "name": "develop", "prerelease": "SNAPSHOT"  ,
     - if .rc_branch  
      "name": "  .rc_branch  ", "prerelease": "rc"  ,
     - end  
    "main"
  ]
 
The values used to process the template are defined on a file built on the fly (releaserc_values.yaml) that includes the following keys and values:
  • branch: the name of the current branch
  • gitlab_url: the URL of the gitlab server (the value is taken from the CI_SERVER_URL variable)
  • rc_branch: the name of the current rc branch; we only set the value if we are processing one because semantic-release only allows one branch to match the rc prefix and if we use a wildcard (i.e. release/*) but the users keep more than one release/#.#.# branch open at the same time the calls to semantic-release will fail for sure.
  • sr_local_plugin: the path to the local plugin we use (shown later)
The template also uses a values_$ project_type _project.yaml file that includes settings specific to the project type, the one for nodejs is as follows:
replacements:
  - files:
      - "package.json"
    from: "\"version\": \".*\""
    to: "\"version\": \"$ nextRelease.version \""
assets:
  - "CHANGELOG.md"
  - "package.json"
The replacements section is used to update the version field on the relevant files of the project (in our case the package.json file) and the assets section includes the files that will be committed to the repository when the release is published (looking at the template you can see that the CHANGELOG.md is only updated for the main branch, we do it this way because if we update the file on other branches it creates a merge nightmare and we are only interested on it for released versions anyway). The local plugin adds code to rename the package.json_disabled file to package.json if present and prints the last and next versions on the logs with a format that can be easily parsed using sed:
local-plugin.cjs
// Minimal plugin to:
// - rename the package.json_disabled file to package.json if present
// - log the semantic-release last & next versions
function verifyConditions(pluginConfig, context)  
  var fs = require('fs');
  if (fs.existsSync('package.json_disabled'))  
    fs.renameSync('package.json_disabled', 'package.json');
    context.logger.log( verifyConditions: renamed 'package.json_disabled' to 'package.json' );
   
 
function analyzeCommits(pluginConfig, context)  
  if (context.lastRelease && context.lastRelease.version)  
    context.logger.log( analyzeCommits: LAST_VERSION=$ context.lastRelease.version  );
   
 
function verifyRelease(pluginConfig, context)  
  if (context.nextRelease && context.nextRelease.version)  
    context.logger.log( verifyRelease: NEXT_VERSION=$ context.nextRelease.version  );
   
 
module.exports =  
  verifyConditions,
  analyzeCommits,
  verifyRelease
 

The git_push_setup functionThe code for the git_push_setup function is the following:
git_push_setup()
 
  # Update global credentials to allow git clone & push for all the group repos
  git config --global credential.helper store
  cat >"$HOME/.git-credentials" <<EOF
https://fake-user:$ GITLAB_REPOSITORY_TOKEN @gitlab.com
EOF
  # Define user name, mail and signing key for semantic-release
  user_name="$SR_USER_NAME"
  user_email="$SR_USER_EMAIL"
  ssh_signing_key="$SSH_SIGNING_KEY"
  # Export git user variables
  export GIT_AUTHOR_NAME="$user_name"
  export GIT_AUTHOR_EMAIL="$user_email"
  export GIT_COMMITTER_NAME="$user_name"
  export GIT_COMMITTER_EMAIL="$user_email"
  # Sign commits with ssh if there is a SSH_SIGNING_KEY variable
  if [ "$ssh_signing_key" ]; then
    echo "Configuring GIT to sign commits with SSH"
    ssh_keyfile="/tmp/.ssh-id"
    : >"$ssh_keyfile"
    chmod 0400 "$ssh_keyfile"
    echo "$ssh_signing_key"   tr -d '\r' >"$ssh_keyfile"
    git config gpg.format ssh
    git config user.signingkey "$ssh_keyfile"
    git config commit.gpgsign true
  fi
 
The function assumes that the GITLAB_REPOSITORY_TOKEN variable (set on the CI/CD variables section of the project or group we want) contains a token with read_repository and write_repository permissions on all the projects we are going to use this function. The SR_USER_NAME and SR_USER_EMAIL variables can be defined on a common file or the CI/CD variables section of the project or group we want to work with and the script assumes that the optional SSH_SIGNING_KEY is exported as a CI/CD default value of type variable (that is why the keyfile is created on the fly) and git is configured to use it if the variable is not empty.
Warning: Keep in mind that the variables GITLAB_REPOSITORY_TOKEN and SSH_SIGNING_KEY contain secrets, so probably is a good idea to make them protected (if you do that you have to make the develop, main and release/* branches protected too).
Warning: The semantic-release user has to be able to push to all the projects on those protected branches, it is a good idea to create a dedicated user and add it as a MAINTAINER for the projects we want (the MAINTAINERS need to be able to push to the branches), or, if you are using a Gitlab with a Premium license you can use the api to allow the semantic-release user to push to the protected branches without allowing it for any other user.

The semantic-release commandOnce we have the .releaserc file and the git configuration ready we run the semantic-release command. If the branch we are working with has one or more commits that will increment the version, the tool does the following (note that the steps are described are the ones executed if we use the configuration we have generated):
  1. It detects the commits that will increment the version and calculates the next version number.
  2. Generates the release notes for the version.
  3. Applies the replacements defined on the configuration (in our example updates the version field on the package.json file).
  4. Updates the CHANGELOG.md file adding the release notes if we are going to publish the file (when we are on the main branch).
  5. Creates a commit if all or some of the files listed on the assets key have changed and uses the commit message we have defined, replacing the variables for their current values.
  6. Creates a tag with the new version number and the release notes.
  7. As we are using the gitlab plugin after tagging it also creates a release on the project with the tag name and the release notes.

Notes about the git workflows and merges between branchesIt is very important to remember that semantic-release looks at the commits of a given branch when calculating the next version to publish, that has two important implications:
  1. On pre release branches we need to have the commit that includes the tag with the released version, if we don t have it the next version is not calculated correctly.
  2. It is a bad idea to squash commits when merging a branch to another one, if we do that we will lose the information semantic-release needs to calculate the next version and even if we use the right prefix for the squashed commit (fix, feat, ) we miss all the messages that would otherwise go to the CHANGELOG.md file.
To make sure that we have the right commits on the pre release branches we should merge the main branch changes into the develop one after each release tag is created; in my pipelines the fist job that processes a release tag creates a branch from the tag and an MR to merge it to develop. The important thing about that MR is that is must not be squashed, if we do that the tag commit will probably be lost, so we need to be careful. To merge the changes directly we can run the following code:
# Set the SR_TAG variable to the tag you want to process
SR_TAG="v1.3.2"
# Fetch all the changes
git fetch --all --prune
# Switch to the main branch
git switch main
# Pull all the changes
git pull
# Switch to the development branch
git switch develop
# Pull all the changes
git pull
# Create followup branch from tag
git switch -c "followup/$SR_TAG" "$SR_TAG"
# Change files manually & commit the changed files
git commit -a --untracked-files=no -m "ci(followup): $SR_TAG to develop"
# Switch to the development branch
git switch develop
# Merge the followup branch into the development one using the --no-ff option
git merge --no-ff "followup/$SR_TAG"
# Remove the followup branch
git branch -d "followup/$SR_TAG"
# Push the changes
git push
If we can t push directly to develop we can create a MR pushing the followup branch after committing the changes, but we have to make sure that we don t squash the commits when merging or it will not work as we want.

23 December 2023

Russ Allbery: Review: Bookshops & Bonedust

Review: Bookshops & Bonedust, by Travis Baldree
Series: Legends & Lattes #2
Publisher: Tor
Copyright: 2023
ISBN: 1-250-88611-2
Format: Kindle
Pages: 337
Bookshops & Bonedust is a prequel to the cozy fantasy Legends & Lattes. You can read them in either order, although the epilogue of Bookshops & Bonedust spoils (somewhat guessable) plot developments in Legends & Lattes. Viv is a new member of the mercenary troop Rackam's Ravens and is still possessed of more enthusiasm than sense. As the story opens, she charges well ahead of her allies and nearly gets killed by a pike through the leg. She survives, but her leg needs time to heal and she is not up to the further pursuit of a necromancer. Rackam pays for a room and a doctor in the small seaside town of Murk and leaves her there to recuperate. The Ravens will pick her up when they come back through town, whenever that is. Viv is very quickly bored out of her skull. On a whim, and after some failures to find something else to occupy her, she tries a run-down local bookstore and promptly puts her foot through the boardwalk outside it. That's the start of an improbable friendship with the proprietor, a rattkin named Fern with a knack for book recommendations and a serious cash flow problem. Viv, being Viv, soon decides to make herself useful. The good side and bad side of this book are the same: it's essentially the same book as Legends & Lattes, but this time with a bookstore. There's a medieval sword and sorcery setting, a wide variety of humanoid species, a local business that needs love and attention (this time because it's failing instead of new), a lurking villain, an improbable store animal (this time a gryphlet that I found less interesting than the cat of the coffee shop), and a whole lot of found family. It turns out I was happy to read that story again, and there were some things I liked better in this version. I find bookstores more interesting than coffee shops, and although Viv and Fern go through a similar process of copying features of a modern bookstore, this felt less strained than watching Viv reinvent the precise equipment and menu of a modern coffee shop in a fantasy world. Also, Fern is an absolute delight, probably my favorite character in either of the books. I love the way that she uses book recommendations as a way of asking questions and guessing at answers about other people. As with the first book, Baldree's world-building is utterly unconcerned with trying to follow the faux-medieval conventions of either sword and sorcery or D&D-style role-playing games. On one hand, I like this; most of that so-called medievalism is nonsense anyway, and there's no reason why fantasy with D&D-style species diversity should be set in a medieval world. On the other hand, this world seems exactly like a US small town except the tavern also has rooms for rent, there are roving magical armies, and everyone fights with swords for some reason. It feels weirdly anachronistic, and I can't tell if that's because I've been brainwashed into thinking fantasy has to be medievaloid or if it's a true criticism of the book. I was reminded somewhat of reading Jack McDevitt's SF novels, which are supposedly set in the far future but are indistinguishable from 1980s suburbia except with flying cars. The other oddity with this book is that the reader of the series knows Viv isn't going to stay. This is the problem with writing a second iteration of this story as a prequel. I see why Baldree did it the story wouldn't have worked if Viv were already established but it casts a bit of a pall over the cheeriness of the story. Baldree to his credit confronts this directly, weaves it into the relationships, and salvages it a bit more in the epilogue, but it gave the story a sort of preemptive wistfulness that was at odds with how I wanted to read it. But, despite that, the strength of this book are the characters. Viv is a good person who helps where she can, which sounds like a simple thing but is so restful to read about. This book features her first meeting with the gnome Gallina, who is always a delight. There are delicious baked goods from a dwarf, a grumpy doctor, a grumpier city guard, and a whole cast of people who felt complicated and normal and essentially decent. I'm not sure the fantasy elements do anything for this book, or this series, other than marketing and the convenience of a few plot devices. Even though one character literally disappears into a satchel, it felt like Baldree could have written roughly the same story as a contemporary novel without a hint of genre. But that's not really a complaint, since the marketing works. I would not have read this series if it had been contemporary novels, and I thoroughly enjoyed it. It's a slice of life novel about kind and decent people for readers who are bored by contemporary settings and would rather read fantasy. Works for me. I'm hoping Baldree finds other stories, since I'm not sure I want to read this one several more times, but twice was not too much. If you liked Legends & Lattes and are thinking "how can I get more of that," here's the book for you. If you haven't read Legends & Lattes, I think I would recommend reading this one first. It does many of the same things, it's a bit more polished, and then you can read Viv's adventures in internal chronological order. Rating: 8 out of 10

16 December 2023

Thomas Lange: Adding a writeable data partition to an ISO image

Some years ago a customer needed a live ISO containing a customized FAI environment (not for installing but for extended hardware stress tests), but on an USB stick with the possibility to store the logs of the tests on the USB stick. But an ISO file system (iso9660) remains read-only, even when put onto an USB stick. I had the idea to add another partition onto the USB stick after the ISO was written to it (using cp or dd). You can use fdisk with an ISO file, add a new partition, loop mount the ISO and format this partition. That's all. This worked perfect for my customer. I forgot this idea for a while but a few weeks ago I remembered it. What could be possible when my FAI (Fully Automatic Installation) image would also provide such a partition? Which things could be provided on this partition? Could I provide a FAI ISO and my users would be able to easily put their own .deb package onto it without remastering the ISO or building an ISO on their own? Now here's the shell script, that extends an ISO or an USB stick with an ext4 or exFAT partition and set the file system label to MY-DATA. https://github.com/faiproject/fai/blob/master/bin/mk-data-partition Examples how to use mk-data-partition
Add a data partition of size 1G to the Debian installer ISO using an ext4 partition
# mk-data-partition -s 1G debian-12.2.0-amd64-netinst.iso
Create the data partition using an exFAT file system on USB named /dev/sdb.
First copy (or dd) the ISO onto the USB stick. Then add the data partition
to the USB stick.
# cp faicd64-large_6.0.3.iso /dev/sdb
# mk-data-partition -F /dev/sdb
Create the data partition and copy directories A and B to it
# mk-data-partition -c debian-12.2.0-amd64-netinst.iso A B
The next FAI version will use this in different parts of an installation. A blog post about this will follow. A new idea for our Debian installer ISO Here are my ideas how the Debian installer could use such a partition if it automatically detects and mounts it (by it's file system label): The advantage of this approach is that there's no need for the user to remaster the official Debian installer ISO, which is not easy for end users. We only have to extend the installer to use files from this data partition in some portions of the installation. Additional udebs, packages or firmware could automatically be used by the installer. Companies could easily create an OEM installer of Debian. What do you think about this idea? Please send feedback to lange@debian.org

12 December 2023

Raju Devidas: Nextcloud AIO install with docker-compose and nginx reverse proxy

Nextcloud AIO install with docker-compose and nginx reverse proxyNextcloud is a popular self-hosted solution for file sync and share as well as cloud apps such as document editing, chat and talk, calendar, photo gallery etc. This guide will walk you through setting up Nextcloud AIO using Docker Compose. This blog post would not be possible without immense help from Sahil Dhiman a.k.a. sahilisterThere are various ways in which the installation could be done, in our setup here are the pre-requisites.

Step 1 : The docker-compose file for nextcloud AIOThe original compose.yml file is present in nextcloud AIO&aposs git repo here . By taking a reference of that file, we have own compose.yml here.
services:
  nextcloud-aio-mastercontainer:
    image: nextcloud/all-in-one:latest
    init: true
    restart: always
    container_name: nextcloud-aio-mastercontainer # This line is not allowed to be changed as otherwise AIO will not work correctly
    volumes:
      - nextcloud_aio_mastercontainer:/mnt/docker-aio-config # This line is not allowed to be changed as otherwise the built-in backup solution will not work
      - /var/run/docker.sock:/var/run/docker.sock:ro # May be changed on macOS, Windows or docker rootless. See the applicable documentation. If adjusting, don&apost forget to also set &aposWATCHTOWER_DOCKER_SOCKET_PATH&apos!
    ports:
      - 8080:8080
    environment: # Is needed when using any of the options below
      # - AIO_DISABLE_BACKUP_SECTION=false # Setting this to true allows to hide the backup section in the AIO interface. See https://github.com/nextcloud/all-in-one#how-to-disable-the-backup-section
      - APACHE_PORT=32323 # Is needed when running behind a web server or reverse proxy (like Apache, Nginx, Cloudflare Tunnel and else). See https://github.com/nextcloud/all-in-one/blob/main/reverse-proxy.md
      - APACHE_IP_BINDING=127.0.0.1 # Should be set when running behind a web server or reverse proxy (like Apache, Nginx, Cloudflare Tunnel and else) that is running on the same host. See https://github.com/nextcloud/all-in-one/blob/main/reverse-proxy.md
      # - BORG_RETENTION_POLICY=--keep-within=7d --keep-weekly=4 --keep-monthly=6 # Allows to adjust borgs retention policy. See https://github.com/nextcloud/all-in-one#how-to-adjust-borgs-retention-policy
      # - COLLABORA_SECCOMP_DISABLED=false # Setting this to true allows to disable Collabora&aposs Seccomp feature. See https://github.com/nextcloud/all-in-one#how-to-disable-collaboras-seccomp-feature
      - NEXTCLOUD_DATADIR=/opt/docker/cloud.raju.dev/nextcloud # Allows to set the host directory for Nextcloud&aposs datadir.   Warning: do not set or adjust this value after the initial Nextcloud installation is done! See https://github.com/nextcloud/all-in-one#how-to-change-the-default-location-of-nextclouds-datadir
      # - NEXTCLOUD_MOUNT=/mnt/ # Allows the Nextcloud container to access the chosen directory on the host. See https://github.com/nextcloud/all-in-one#how-to-allow-the-nextcloud-container-to-access-directories-on-the-host
      # - NEXTCLOUD_UPLOAD_LIMIT=10G # Can be adjusted if you need more. See https://github.com/nextcloud/all-in-one#how-to-adjust-the-upload-limit-for-nextcloud
      # - NEXTCLOUD_MAX_TIME=3600 # Can be adjusted if you need more. See https://github.com/nextcloud/all-in-one#how-to-adjust-the-max-execution-time-for-nextcloud
      # - NEXTCLOUD_MEMORY_LIMIT=512M # Can be adjusted if you need more. See https://github.com/nextcloud/all-in-one#how-to-adjust-the-php-memory-limit-for-nextcloud
      # - NEXTCLOUD_TRUSTED_CACERTS_DIR=/path/to/my/cacerts # CA certificates in this directory will be trusted by the OS of the nexcloud container (Useful e.g. for LDAPS) See See https://github.com/nextcloud/all-in-one#how-to-trust-user-defined-certification-authorities-ca
      # - NEXTCLOUD_STARTUP_APPS=deck twofactor_totp tasks calendar contacts notes # Allows to modify the Nextcloud apps that are installed on starting AIO the first time. See https://github.com/nextcloud/all-in-one#how-to-change-the-nextcloud-apps-that-are-installed-on-the-first-startup
      # - NEXTCLOUD_ADDITIONAL_APKS=imagemagick # This allows to add additional packages to the Nextcloud container permanently. Default is imagemagick but can be overwritten by modifying this value. See https://github.com/nextcloud/all-in-one#how-to-add-os-packages-permanently-to-the-nextcloud-container
      # - NEXTCLOUD_ADDITIONAL_PHP_EXTENSIONS=imagick # This allows to add additional php extensions to the Nextcloud container permanently. Default is imagick but can be overwritten by modifying this value. See https://github.com/nextcloud/all-in-one#how-to-add-php-extensions-permanently-to-the-nextcloud-container
      # - NEXTCLOUD_ENABLE_DRI_DEVICE=true # This allows to enable the /dev/dri device in the Nextcloud container.   Warning: this only works if the &apos/dev/dri&apos device is present on the host! If it should not exist on your host, don&apost set this to true as otherwise the Nextcloud container will fail to start! See https://github.com/nextcloud/all-in-one#how-to-enable-hardware-transcoding-for-nextcloud
      # - NEXTCLOUD_KEEP_DISABLED_APPS=false # Setting this to true will keep Nextcloud apps that are disabled in the AIO interface and not uninstall them if they should be installed. See https://github.com/nextcloud/all-in-one#how-to-keep-disabled-apps
      # - TALK_PORT=3478 # This allows to adjust the port that the talk container is using. See https://github.com/nextcloud/all-in-one#how-to-adjust-the-talk-port
      # - WATCHTOWER_DOCKER_SOCKET_PATH=/var/run/docker.sock # Needs to be specified if the docker socket on the host is not located in the default &apos/var/run/docker.sock&apos. Otherwise mastercontainer updates will fail. For macos it needs to be &apos/var/run/docker.sock&apos
    # networks: # Is needed when you want to create the nextcloud-aio network with ipv6-support using this file, see the network config at the bottom of the file
      # - nextcloud-aio # Is needed when you want to create the nextcloud-aio network with ipv6-support using this file, see the network config at the bottom of the file
      # - SKIP_DOMAIN_VALIDATION=true
    # # Uncomment the following line when using SELinux
    # security_opt: ["label:disable"]
volumes: # If you want to store the data on a different drive, see https://github.com/nextcloud/all-in-one#how-to-store-the-filesinstallation-on-a-separate-drive
  nextcloud_aio_mastercontainer:
    name: nextcloud_aio_mastercontainer # This line is not allowed to be changed as otherwise the built-in backup solution will not work
I have not removed many of the commented options in the compose file, for a possibility of me using them in the future.If you want a smaller cleaner compose with the extra options, you can refer to
services:
  nextcloud-aio-mastercontainer:
    image: nextcloud/all-in-one:latest
    init: true
    restart: always
    container_name: nextcloud-aio-mastercontainer
    volumes:
      - nextcloud_aio_mastercontainer:/mnt/docker-aio-config
      - /var/run/docker.sock:/var/run/docker.sock:ro
    ports:
      - 8080:8080
    environment:
      - APACHE_PORT=32323
      - APACHE_IP_BINDING=127.0.0.1
      - NEXTCLOUD_DATADIR=/opt/docker/nextcloud
volumes:
  nextcloud_aio_mastercontainer:
    name: nextcloud_aio_mastercontainer
I am using a separate directory to store nextcloud data. As per nextcloud documentation you should be using a separate partition if you want to use this feature, however I did not have that option on my server, so I used a separate directory instead. Also we use a custom port on which nextcloud listens for operations, we have set it up as 32323 above, but you can use any in the permissible port range. The 8080 port is used the setup the AIO management interface. Both 8080 and the APACHE_PORT do not need to be open on the host machine, as we will be using reverse proxy setup with nginx to direct requests. once you have your preferred compose.yml file, you can start the containers using
$ docker-compose -f compose.yml up -d 
Creating network "clouddev_default" with the default driver
Creating volume "nextcloud_aio_mastercontainer" with default driver
Creating nextcloud-aio-mastercontainer ... done
once your container&aposs are running, we can do the nginx setup.

Step 2: Configuring nginx reverse proxy for our domain on host. A reference nginx configuration for nextcloud AIO is given in the nextcloud git repository here . You can modify the configuration file according to your needs and setup. Here is configuration that we are using

map $http_upgrade $connection_upgrade  
    default upgrade;
    &apos&apos close;
 
server  
    listen 80;
    #listen [::]:80;            # comment to disable IPv6
    if ($scheme = "http")  
        return 301 https://$host$request_uri;
     
    listen 443 ssl http2;      # for nginx versions below v1.25.1
    #listen [::]:443 ssl http2; # for nginx versions below v1.25.1 - comment to disable IPv6
    # listen 443 ssl;      # for nginx v1.25.1+
    # listen [::]:443 ssl; # for nginx v1.25.1+ - keep comment to disable IPv6
    # http2 on;                                 # uncomment to enable HTTP/2        - supported on nginx v1.25.1+
    # http3 on;                                 # uncomment to enable HTTP/3 / QUIC - supported on nginx v1.25.0+
    # quic_retry on;                            # uncomment to enable HTTP/3 / QUIC - supported on nginx v1.25.0+
    # add_header Alt-Svc &aposh3=":443"; ma=86400&apos; # uncomment to enable HTTP/3 / QUIC - supported on nginx v1.25.0+
    # listen 443 quic reuseport;       # uncomment to enable HTTP/3 / QUIC - supported on nginx v1.25.0+ - please remove "reuseport" if there is already another quic listener on port 443 with enabled reuseport
    # listen [::]:443 quic reuseport;  # uncomment to enable HTTP/3 / QUIC - supported on nginx v1.25.0+ - please remove "reuseport" if there is already another quic listener on port 443 with enabled reuseport - keep comment to disable IPv6
    server_name cloud.example.com;
    location /  
        proxy_pass http://127.0.0.1:32323$request_uri;
        proxy_set_header X-Forwarded-For $proxy_add_x_forwarded_for;
        proxy_set_header X-Forwarded-Port $server_port;
        proxy_set_header X-Forwarded-Scheme $scheme;
        proxy_set_header X-Forwarded-Proto $scheme;
        proxy_set_header X-Real-IP $remote_addr;
        proxy_set_header Accept-Encoding "";
        proxy_set_header Host $host;
    
        client_body_buffer_size 512k;
        proxy_read_timeout 86400s;
        client_max_body_size 0;
        # Websocket
        proxy_http_version 1.1;
        proxy_set_header Upgrade $http_upgrade;
        proxy_set_header Connection $connection_upgrade;
     
    ssl_certificate /etc/letsencrypt/live/cloud.example.com/fullchain.pem; # managed by Certbot
    ssl_certificate_key /etc/letsencrypt/live/cloud.example.com/privkey.pem; # managed by Certbot
    ssl_session_timeout 1d;
    ssl_session_cache shared:MozSSL:10m; # about 40000 sessions
    ssl_session_tickets off;
    ssl_protocols TLSv1.2 TLSv1.3;
    ssl_ciphers ECDHE-ECDSA-AES128-GCM-SHA256:ECDHE-RSA-AES128-GCM-SHA256:ECDHE-ECDSA-AES256-GCM-SHA384:ECDHE-RSA-AES256-GCM-SHA384:ECDHE-ECDSA-CHACHA20-POLY1305:ECDHE-RSA-CHACHA20-POLY1305:DHE-RSA-AES128-GCM-SHA256:DHE-RSA-AES256-GCM-SHA384:DHE-RSA-CHACHA20-POLY1305;
    ssl_prefer_server_ciphers on;
    # Optional settings:
    # OCSP stapling
    # ssl_stapling on;
    # ssl_stapling_verify on;
    # ssl_trusted_certificate /etc/letsencrypt/live/<your-nc-domain>/chain.pem;
    # replace with the IP address of your resolver
    # resolver 127.0.0.1; # needed for oscp stapling: e.g. use 94.140.15.15 for adguard / 1.1.1.1 for cloudflared or 8.8.8.8 for google - you can use the same nameserver as listed in your /etc/resolv.conf file
 
Please note that you need to have valid SSL certificates for your domain for this configuration to work. Steps on getting valid SSL certificates for your domain are beyond the scope of this article. You can give a web search on getting SSL certificates with letsencrypt and you will get several resources on that, or may write a blog post on it separately in the future.once your configuration for nginx is done, you can test the nginx configuration using
$ sudo nginx -t 
nginx: the configuration file /etc/nginx/nginx.conf syntax is ok
nginx: configuration file /etc/nginx/nginx.conf test is successful
and then reload nginx with
$ sudo nginx -s reload

Step 3: Setup of Nextcloud AIO from the browser.To setup nextcloud AIO, we need to access it using the web browser on URL of our domain.tld:8080, however we do not want to open the 8080 port publicly to do this, so to complete the setup, here is a neat hack from sahilister
ssh -L 8080:127.0.0.1:8080 username:<server-ip>
you can bind the 8080 port of your server to the 8080 of your localhost using Unix socket forwarding over SSH.The port forwarding only last for the duration of your SSH session, if the SSH session breaks, your port forwarding will to. So, once you have the port forwarded, you can open the nextcloud AIO instance in your web browser at 127.0.0.1:8080
Nextcloud AIO install with docker-compose and nginx reverse proxy
you will get this error because you are trying to access a page on localhost over HTTPS. You can click on advanced and then continue to proceed to the next page. Your data is encrypted over SSH for this session as we are binding the port over SSH. Depending on your choice of browser, the above page might look different.once you have proceeded, the nextcloud AIO interface will open and will look something like this.
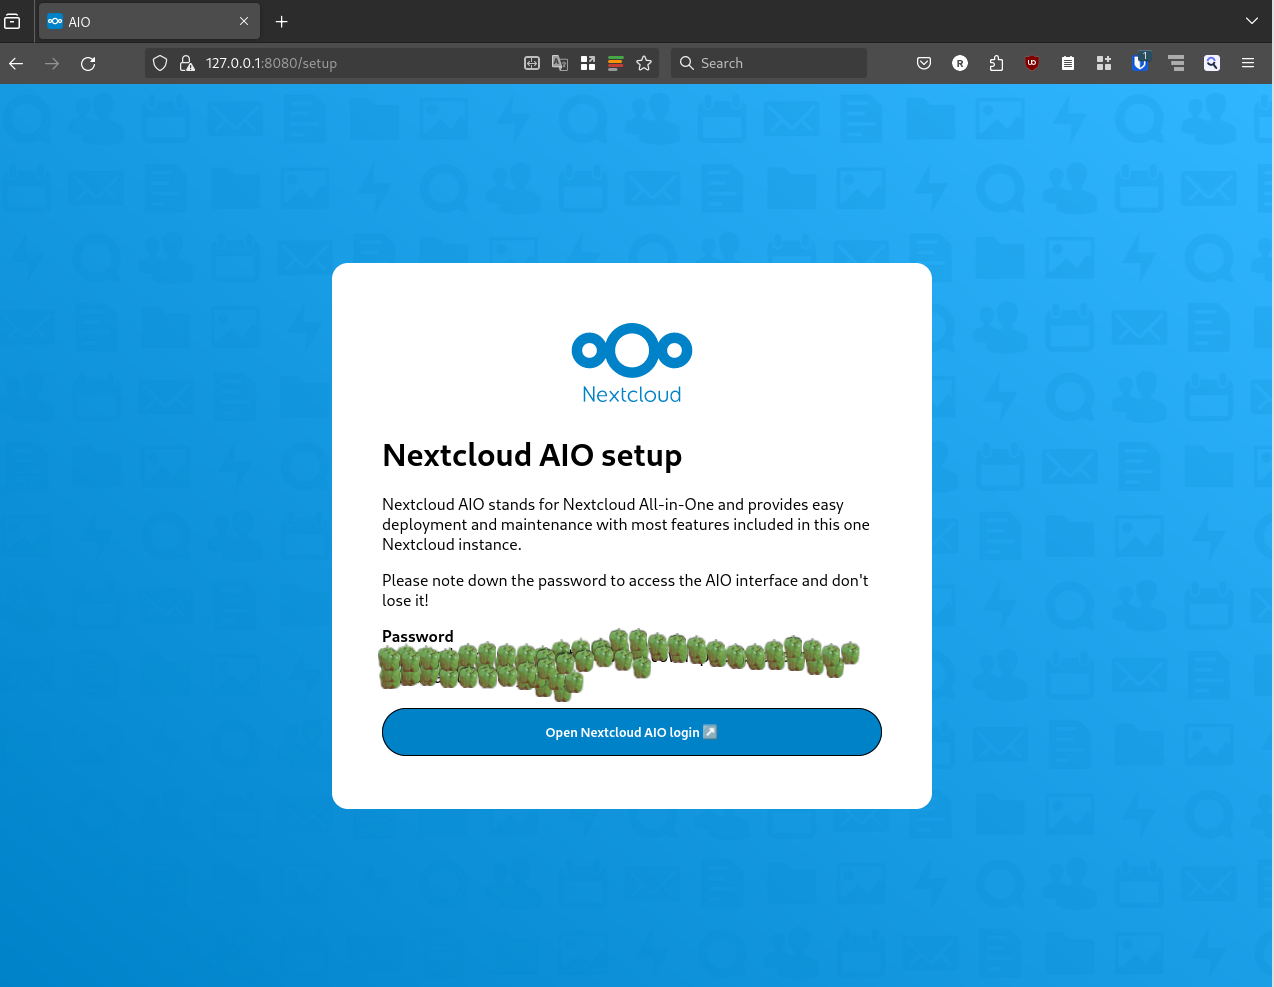
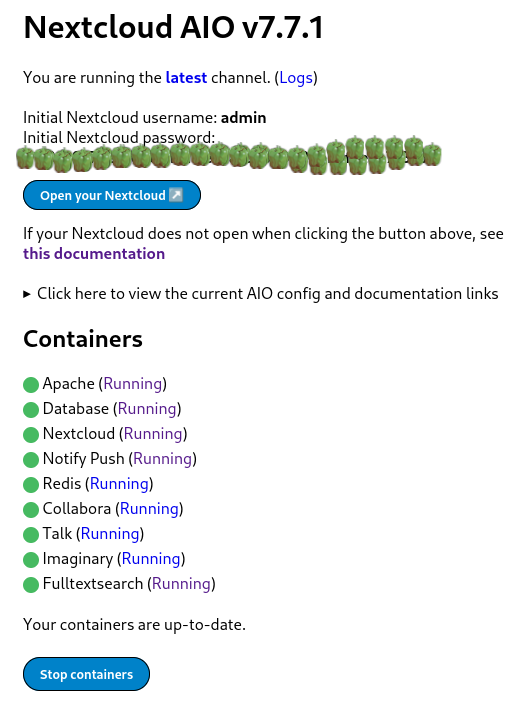
Nextcloud AIO install with docker-compose and nginx reverse proxynextcloud AIO initial screen with capsicums as password
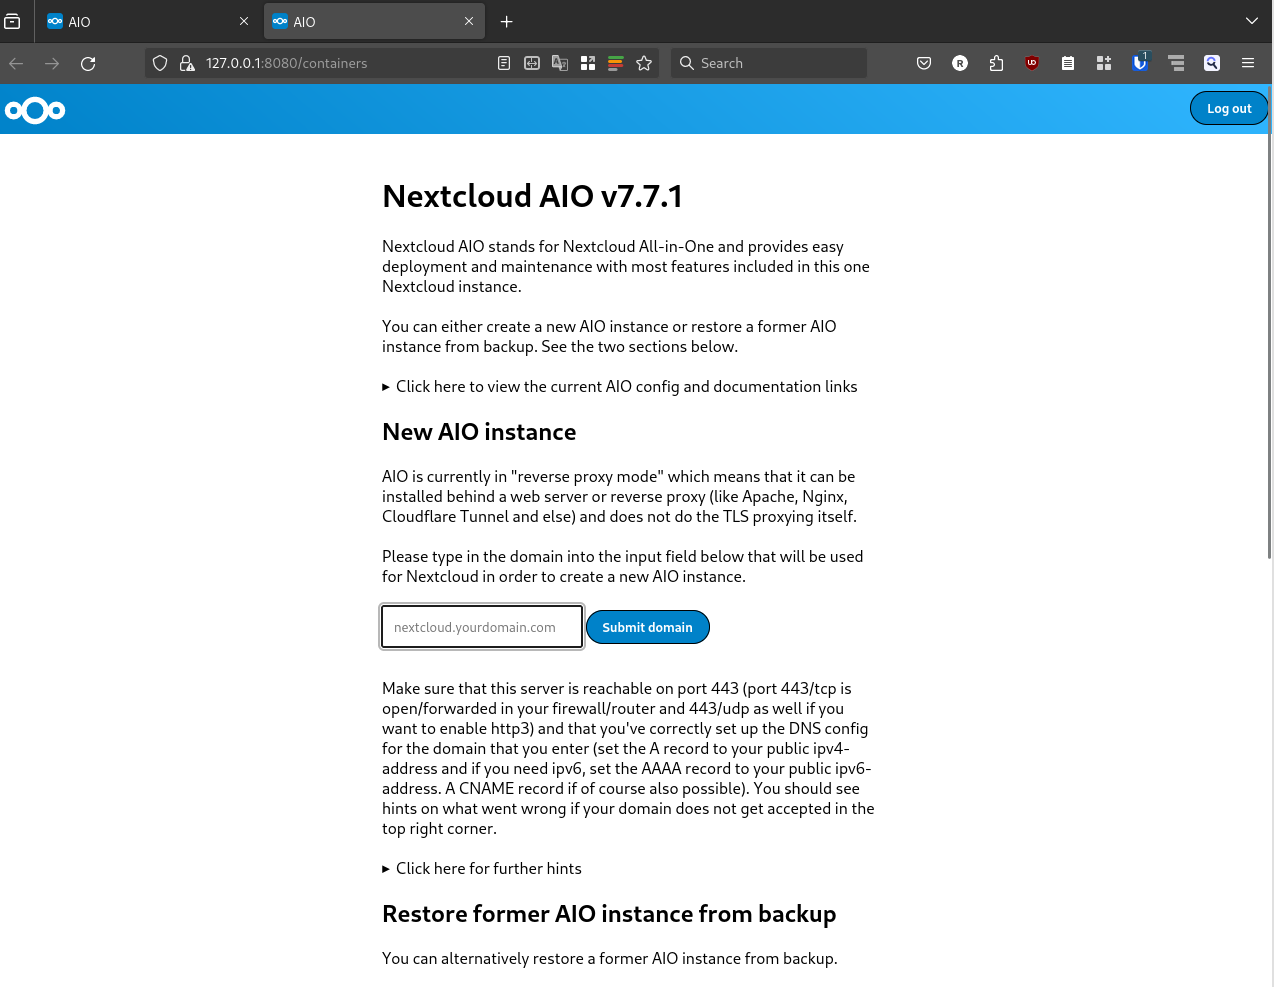
It will show an auto generated passphrase, you need to save this passphrase and make sure to not loose it. For the purposes of security, I have masked the passwords with capsicums. once you have noted down your password, you can proceed to the Nextcloud AIO login, enter your password and then login. After login you will be greeted with a screen like this.
Nextcloud AIO install with docker-compose and nginx reverse proxy
now you can put the domain that you want to use in the Submit domain field. Once the domain check is done, you will proceed to the next step and see another screen like this
Nextcloud AIO install with docker-compose and nginx reverse proxy
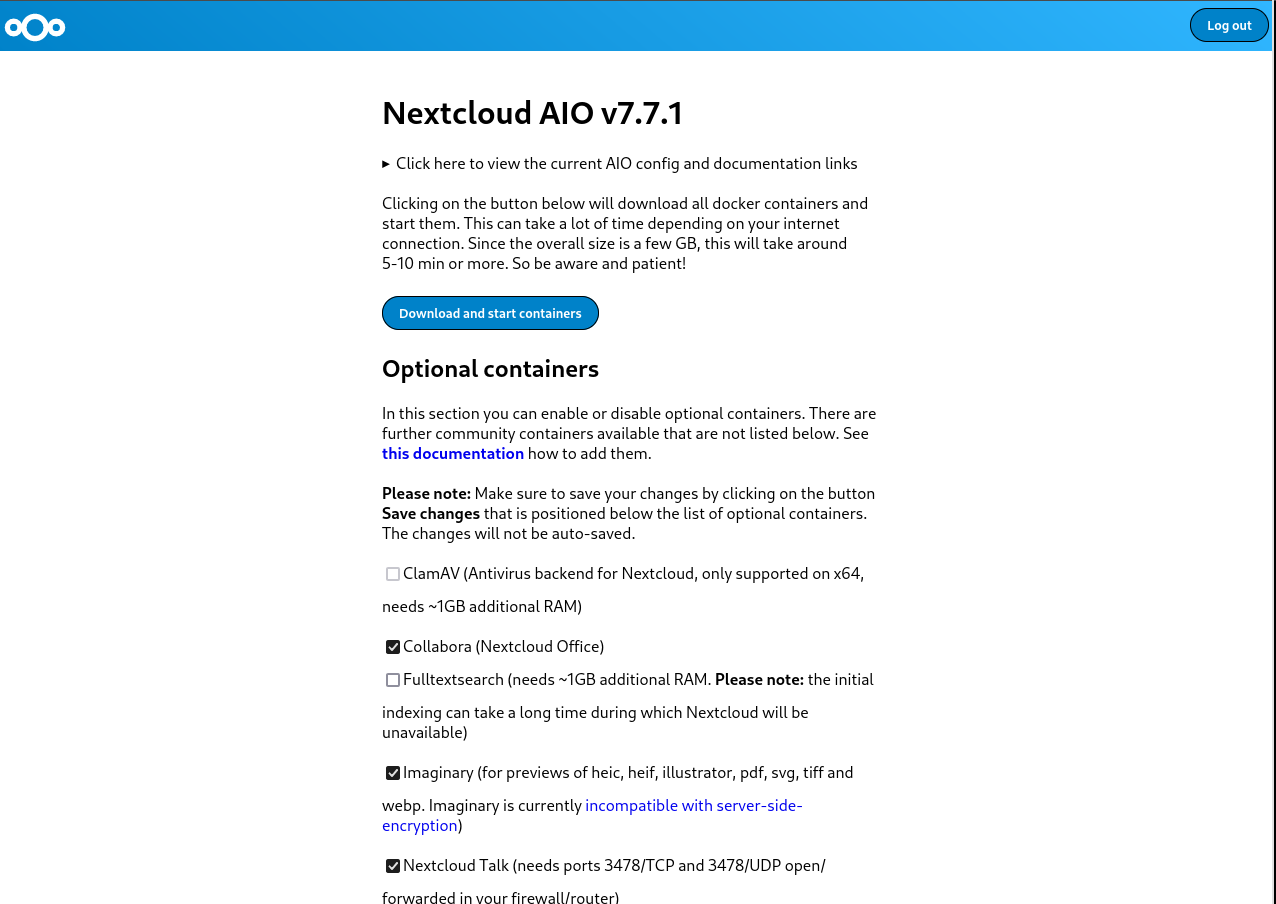
here you can select any optional containers for the features that you might want. IMPORTANT: Please make sure to also change the time zone at the bottom of the page according to the time zone you wish to operate in.
Nextcloud AIO install with docker-compose and nginx reverse proxy
The timezone setup is also important because the data base will get initialized according to the set time zone. This could result in wrong initialization of database and you ending up in a startup loop for nextcloud. I faced this issue and could only resolve it after getting help from sahilister . Once you are done changing the timezone, and selecting any additional features you want, you can click on Download and start the containersIt will take some time for this process to finish, take a break and look at the farthest object in your room and take a sip of water. Once you are done, and the process has finished you will see a page similar to the following one.
Nextcloud AIO install with docker-compose and nginx reverse proxy
wait patiently for everything to turn green.
Nextcloud AIO install with docker-compose and nginx reverse proxy
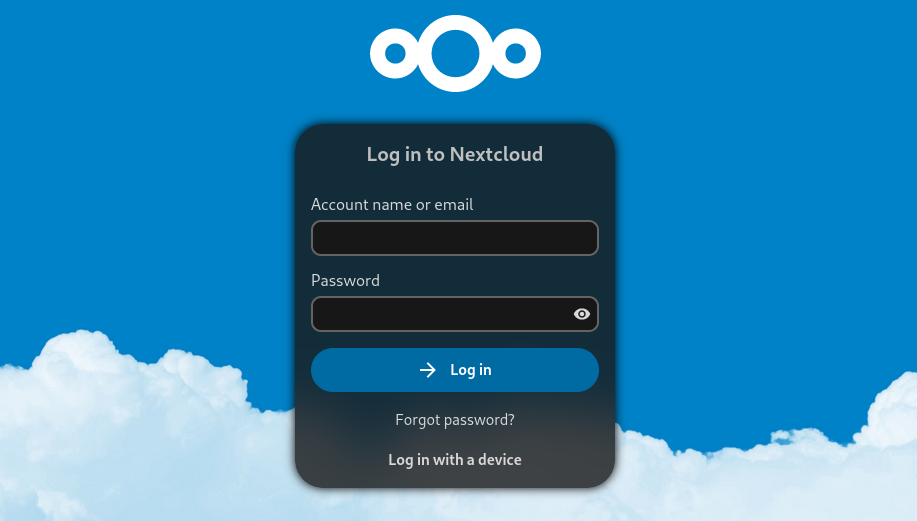
once all the containers have started properly, you can open the nextcloud login interface on your configured domain, the initial login details are auto generated as you can see from the above screenshot. Again you will see a password that you need to note down or save to enter the nextcloud interface. Capsicums will not work as passwords. I have masked the auto generated passwords using capsicums.Now you can click on Open your Nextcloud button or go to your configured domain to access the login screen.
Nextcloud AIO install with docker-compose and nginx reverse proxy
You can use the login details from the previous step to login to the administrator account of your Nextcloud instance. There you have it, your very own cloud!

Additional Notes:

How to properly reset Nextcloud setup?While following the above steps, or while following steps from some other tutorial, you may have made a mistake, and want to start everything again from scratch. The instructions for it are present in the Nextcloud documentation here . Here is the TLDR for a docker-compose setup. These steps will delete all data, do not use these steps on an existing nextcloud setup unless you know what you are doing.
  • Stop your master container.
docker-compose -f compose.yml down -v
The above command will also remove the volume associated with the master container
  • Stop all the child containers that has been started by the master container.
docker stop nextcloud-aio-apache nextcloud-aio-notify-push nextcloud-aio-nextcloud nextcloud-aio-imaginary nextcloud-aio-fulltextsearch nextcloud-aio-redis nextcloud-aio-database nextcloud-aio-talk nextcloud-aio-collabora
  • Remove all the child containers that has been started by the master container
docker rm nextcloud-aio-apache nextcloud-aio-notify-push nextcloud-aio-nextcloud nextcloud-aio-imaginary nextcloud-aio-fulltextsearch nextcloud-aio-redis nextcloud-aio-database nextcloud-aio-talk nextcloud-aio-collabora
  • If you also wish to remove all images associated with nextcloud you can do it with
docker rmi $(docker images --filter "reference=nextcloud/*" -q)
  • remove all volumes associated with child containers
docker volume rm <volume-name>
  • remove the network associated with nextcloud
docker network rm nextcloud-aio

Additional references.
  1. Nextcloud Github
  2. Nextcloud reverse proxy documentation
  3. Nextcloud Administration Guide
  4. Nextcloud User Manual
  5. Nextcloud Developer&aposs manual

10 December 2023

Scarlett Gately Moore: KDE: KDE Snaps 23.08.4, PIM! KDE neon, Debian

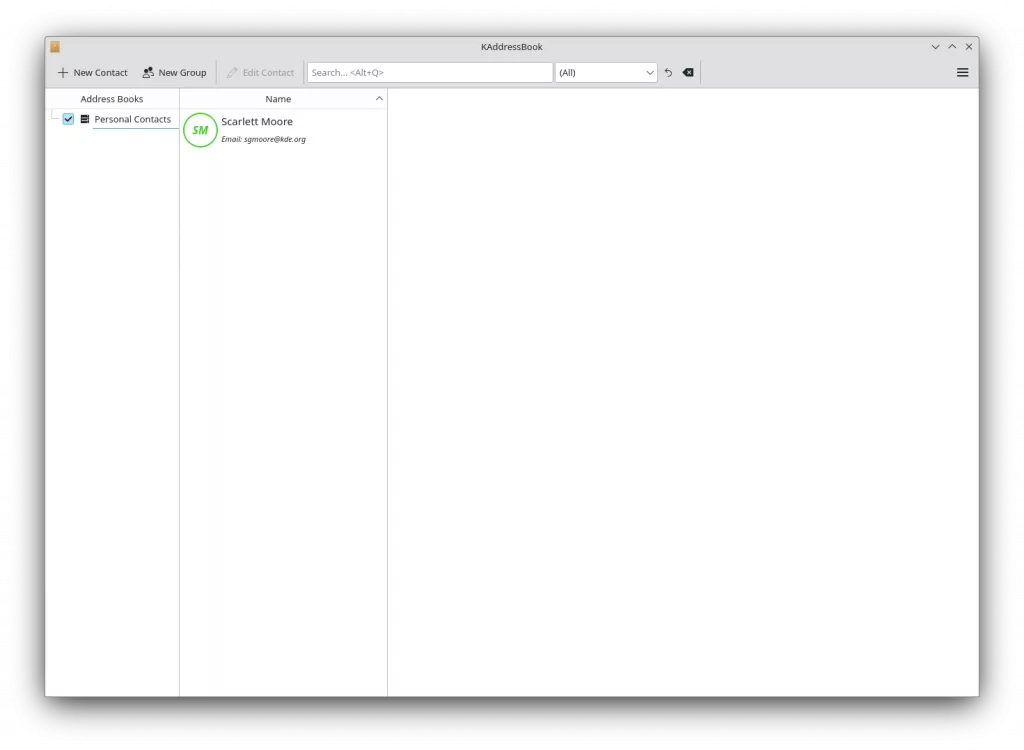
KDE PIM Kaddressbook snapKDE PIM Kaddressbook snap
KDE Snaps: This weeks big accomplishment is KDE PIM snaps! I have successfully added akonadi as a service via an akonadi content snap and running it as a service. Kaddressbook is our first PIM snap with this setup and it works flawlessly! It is available in the snap store. I have a pile of MRs awaiting approvals, so keep your eye out for the rest of PIM in the next day. KDE Applications 23.08.4 has been released and available in the snap store. Krita 5.2.2 has been released. I have created a new kde-qt6 snap as the qt-framework snap has not been updated and the maintainer is unreachable. It is in edge and I will be rebuilding our kf6 snap with this one. I am debugging an issue with the latest Labplot release. KDE neon: This week I helped with frameworks release 5.113 and KDE applications 23.08.4. I also worked on the ongoing Unstable turning red into green builds as the porting to qt6 continues. Debian: With my on going learning packaging for all the programming languages, Rust packaging: I started on Rustic https://github.com/rustic-rs/rustic unfortunately, it was a bit of wasted time as it depends on a feature of tracing-subcriber that depends on matchers which has a grave bug, so it remains disabled. Personal: I do have an interview tomorrow! And it looks like the project may go through after the new year. So things are looking up, unfortunately I must still ask, if you have any spare change please consider a donation. The phone company decided to take an extra $200.00 I didn t have to spare and while I resolved it, they refused a refund, but gave me a credit to next months bill, which doesn t help me now. Thank you for your consideration. https://gofund.me/b74e4c6f

9 December 2023

Simon Josefsson: Classic McEliece goes to IETF and OpenSSH

My earlier work on Streamlined NTRU Prime has been progressing along. The IETF document on sntrup761 in SSH has passed several process points. GnuPG s libgcrypt has added support for sntrup761. The libssh support for sntrup761 is working, but the merge request is stuck mostly due to lack of time to debug why the regression test suite sporadically errors out in non-sntrup761 related parts with the patch. The foundation for lattice-based post-quantum algorithms has some uncertainty around it, and I have felt that there is more to the post-quantum story than adding sntrup761 to implementations. Classic McEliece has been mentioned to me a couple of times, and I took some time to learn it and did a cut n paste job of the proposed ISO standard and published draft-josefsson-mceliece in the IETF to make the algorithm easily available to the IETF community. A high-quality implementation of Classic McEliece has been published as libmceliece and I ve been supporting the work of Jan Moj to package libmceliece for Debian, alas it has been stuck in the ftp-master NEW queue for manual review for over two months. The pre-dependencies librandombytes and libcpucycles are available in Debian already. All that text writing and packaging work set the scene to write some code. When I added support for sntrup761 in libssh, I became familiar with the OpenSSH code base, so it was natural to return to OpenSSH to experiment with a new SSH KEX for Classic McEliece. DJB suggested to pick mceliece6688128 and combine it with the existing X25519+sntrup761 or with plain X25519. While a three-algorithm hybrid between X25519, sntrup761 and mceliece6688128 would be a simple drop-in for those that don t want to lose the benefits offered by sntrup761, I decided to start the journey on a pure combination of X25519 with mceliece6688128. The key combiner in sntrup761x25519 is a simple SHA512 call and the only good I can say about that is that it is simple to describe and implement, and doesn t raise too many questions since it is already deployed. After procrastinating coding for months, once I sat down to work it only took a couple of hours until I had a successful Classic McEliece SSH connection. I suppose my brain had sorted everything in background before I started. To reproduce it, please try the following in a Debian testing environment (I use podman to get a clean environment).
# podman run -it --rm debian:testing-slim
apt update
apt dist-upgrade -y
apt install -y wget python3 librandombytes-dev libcpucycles-dev gcc make git autoconf libz-dev libssl-dev
cd ~
wget -q -O- https://lib.mceliece.org/libmceliece-20230612.tar.gz   tar xfz -
cd libmceliece-20230612/
./configure
make install
ldconfig
cd ..
git clone https://gitlab.com/jas/openssh-portable
cd openssh-portable
git checkout jas/mceliece
autoreconf
./configure # verify 'libmceliece support: yes'
make # CC="cc -DDEBUG_KEX=1 -DDEBUG_KEXDH=1 -DDEBUG_KEXECDH=1"
You should now have a working SSH client and server that supports Classic McEliece! Verify support by running ./ssh -Q kex and it should mention mceliece6688128x25519-sha512@openssh.com. To have it print plenty of debug outputs, you may remove the # character on the final line, but don t use such a build in production. You can test it as follows:
./ssh-keygen -A # writes to /usr/local/etc/ssh_host_...
# setup public-key based login by running the following:
./ssh-keygen -t rsa -f ~/.ssh/id_rsa -P ""
cat ~/.ssh/id_rsa.pub > ~/.ssh/authorized_keys
adduser --system sshd
mkdir /var/empty
while true; do $PWD/sshd -p 2222 -f /dev/null; done &
./ssh -v -p 2222 localhost -oKexAlgorithms=mceliece6688128x25519-sha512@openssh.com date
On the client you should see output like this:
OpenSSH_9.5p1, OpenSSL 3.0.11 19 Sep 2023
...
debug1: SSH2_MSG_KEXINIT sent
debug1: SSH2_MSG_KEXINIT received
debug1: kex: algorithm: mceliece6688128x25519-sha512@openssh.com
debug1: kex: host key algorithm: ssh-ed25519
debug1: kex: server->client cipher: chacha20-poly1305@openssh.com MAC: <implicit> compression: none
debug1: kex: client->server cipher: chacha20-poly1305@openssh.com MAC: <implicit> compression: none
debug1: expecting SSH2_MSG_KEX_ECDH_REPLY
debug1: SSH2_MSG_KEX_ECDH_REPLY received
debug1: Server host key: ssh-ed25519 SHA256:YognhWY7+399J+/V8eAQWmM3UFDLT0dkmoj3pIJ0zXs
...
debug1: Host '[localhost]:2222' is known and matches the ED25519 host key.
debug1: Found key in /root/.ssh/known_hosts:1
debug1: rekey out after 134217728 blocks
debug1: SSH2_MSG_NEWKEYS sent
debug1: expecting SSH2_MSG_NEWKEYS
debug1: SSH2_MSG_NEWKEYS received
debug1: rekey in after 134217728 blocks
...
debug1: Sending command: date
debug1: pledge: fork
debug1: permanently_set_uid: 0/0
Environment:
  USER=root
  LOGNAME=root
  HOME=/root
  PATH=/usr/bin:/bin:/usr/sbin:/sbin:/usr/local/bin
  MAIL=/var/mail/root
  SHELL=/bin/bash
  SSH_CLIENT=::1 46894 2222
  SSH_CONNECTION=::1 46894 ::1 2222
debug1: client_input_channel_req: channel 0 rtype exit-status reply 0
debug1: client_input_channel_req: channel 0 rtype eow@openssh.com reply 0
Sat Dec  9 22:22:40 UTC 2023
debug1: channel 0: free: client-session, nchannels 1
Transferred: sent 1048044, received 3500 bytes, in 0.0 seconds
Bytes per second: sent 23388935.4, received 78108.6
debug1: Exit status 0
Notice the kex: algorithm: mceliece6688128x25519-sha512@openssh.com output. How about network bandwidth usage? Below is a comparison of a complete SSH client connection such as the one above that log in and print date and logs out. Plain X25519 is around 7kb, X25519 with sntrup761 is around 9kb, and mceliece6688128 with X25519 is around 1MB. Yes, Classic McEliece has large keys, but for many environments, 1MB of data for the session establishment will barely be noticeable.
./ssh -v -p 2222 localhost -oKexAlgorithms=curve25519-sha256 date 2>&1   grep ^Transferred
Transferred: sent 3028, received 3612 bytes, in 0.0 seconds
./ssh -v -p 2222 localhost -oKexAlgorithms=sntrup761x25519-sha512@openssh.com date 2>&1   grep ^Transferred
Transferred: sent 4212, received 4596 bytes, in 0.0 seconds
./ssh -v -p 2222 localhost -oKexAlgorithms=mceliece6688128x25519-sha512@openssh.com date 2>&1   grep ^Transferred
Transferred: sent 1048044, received 3764 bytes, in 0.0 seconds
So how about session establishment time?
date; i=0; while test $i -le 100; do ./ssh -v -p 2222 localhost -oKexAlgorithms=curve25519-sha256 date > /dev/null 2>&1; i= expr $i + 1 ; done; date
Sat Dec  9 22:39:19 UTC 2023
Sat Dec  9 22:39:25 UTC 2023
# 6 seconds
date; i=0; while test $i -le 100; do ./ssh -v -p 2222 localhost -oKexAlgorithms=sntrup761x25519-sha512@openssh.com date > /dev/null 2>&1; i= expr $i + 1 ; done; date
Sat Dec  9 22:39:29 UTC 2023
Sat Dec  9 22:39:38 UTC 2023
# 9 seconds
date; i=0; while test $i -le 100; do ./ssh -v -p 2222 localhost -oKexAlgorithms=mceliece6688128x25519-sha512@openssh.com date > /dev/null 2>&1; i= expr $i + 1 ; done; date
Sat Dec  9 22:39:55 UTC 2023
Sat Dec  9 22:40:07 UTC 2023
# 12 seconds
I never noticed adding sntrup761, so I m pretty sure I wouldn t notice this increase either. This is all running on my laptop that runs Trisquel so take it with a grain of salt but at least the magnitude is clear. Future work items include: Happy post-quantum SSH ing! Update: Changing the mceliece6688128_keypair call to mceliece6688128f_keypair (i.e., using the fully compatible f-variant) results in McEliece being just as fast as sntrup761 on my machine. Update 2023-12-26: An initial IETF document draft-josefsson-ssh-mceliece-00 published.

5 December 2023

Matthew Garrett: Why does Gnome fingerprint unlock not unlock the keyring?

There's a decent number of laptops with fingerprint readers that are supported by Linux, and Gnome has some nice integration to make use of that for authentication purposes. But if you log in with a fingerprint, the moment you start any app that wants to access stored passwords you'll get a prompt asking you to type in your password, which feels like it somewhat defeats the point. Mac users don't have this problem - authenticate with TouchID and all your passwords are available after login. Why the difference?

Fingerprint detection can be done in two primary ways. The first is that a fingerprint reader is effectively just a scanner - it passes a graphical representation of the fingerprint back to the OS and the OS decides whether or not it matches an enrolled finger. The second is for the fingerprint reader to make that determination itself, either storing a set of trusted fingerprints in its own storage or supporting being passed a set of encrypted images to compare against. Fprint supports both of these, but note that in both cases all that we get at the end of the day is a statement of "The fingerprint matched" or "The fingerprint didn't match" - we can't associate anything else with that.

Apple's solution involves wiring the fingerprint reader to a secure enclave, an independently running security chip that can store encrypted secrets or keys and only release them under pre-defined circumstances. Rather than the fingerprint reader providing information directly to the OS, it provides it to the secure enclave. If the fingerprint matches, the secure enclave can then provide some otherwise secret material to the OS. Critically, if the fingerprint doesn't match, the enclave will never release this material.

And that's the difference. When you perform TouchID authentication, the secure enclave can decide to release a secret that can be used to decrypt your keyring. We can't easily do this under Linux because we don't have an interface to store those secrets. The secret material can't just be stored on disk - that would allow anyone who had access to the disk to use that material to decrypt the keyring and get access to the passwords, defeating the object. We can't use the TPM because there's no secure communications channel between the fingerprint reader and the TPM, so we can't configure the TPM to release secrets only if an associated fingerprint is provided.

So the simple answer is that fingerprint unlock doesn't unlock the keyring because there's currently no secure way to do that. It's not intransigence on the part of the developers or a conspiracy to make life more annoying. It'd be great to fix it, but I don't see an easy way to do so at the moment.

comment count unavailable comments

27 November 2023

Andrew Cater: 20231123 - UEFI install on a Raspberry Pi 4 - step by step instructions to a modified d-i

Motivation
Andy (RattusRattus) and I have been formalising instructions for using Pete Batard's version of Tianocore (and therefore UEFI booting) for the Raspberry Pi 4 together with a Debian arm64 netinst to make a modified Debian installer on a USB stick which "just works" for a Raspberry Pi 4.
Thanks also to Steve McIntyre for initial notes that got this working for us and also to Emmanuele Rocca for putting up some useful instructions for copying.

Recipe

Plug in a USB stick - use dmesg or your favourite method to see how it is identified.

Make a couple of mount points under /mnt - /mnt/data and /mnt/cdrom


1. Grab a USB stick, Partition using MBR. Make a single VFAT
partition, type 0xEF (i.e. EFI System Partition)

For a USB stick (identified as sdX) below:
$ sudo parted --script /dev/sdX mklabel msdos $ sudo parted --script /dev/sdX mkpart primary fat32 0% 100% $ sudo mkfs.vfat /dev/sdX1 $ sudo mount /dev/sdX1 /mnt/data/

Download an arm64 netinst.iso

https://cdimage.debian.org/debian-cd/current/arm64/iso-cd/debian-12.2.0-arm64-netinst.iso

2. Copy the complete contents of partition *1* from a Debian arm64
installer image into the filesystem (partition 1 is the installer
stuff itself) on the USB stick, in /

$ sudo kpartx -v -a debian-12.2.0-arm64-netinst.iso # Mount the first partition on the ISO and copy its contents to the stick $ sudo mount /dev/mapper/loop0p1 /mnt/cdrom/ $ sudo rsync -av /mnt/cdrom/ /mnt/data/ $ sudo umount /mnt/cdrom

3. Copy the complete contents of partition *2* from that Debian arm64
installer image into that filesystem (partition 2 is the ESP) on
the USB stick, in /

# Same story with the second partition on the ISO

$ sudo mount /dev/mapper/loop0p2 /mnt/cdrom/

$ sudo rsync -av /mnt/cdrom/ /mnt/data/ $ sudo umount /mnt/cdrom

$ sudo kpartx -d debian-testing-amd64-netinst.iso $ sudo umount /mnt/data


4. Grab the rpi edk2 build from https://github.com/pftf/RPi4/releases
(I used 1.35) and extract it. I copied the files there into *2*
places for now on the USB stick:

/ (so the Pi will boot using it)
/rpi4 (so we can find the files again later)

5. Add the preseed.cfg file (attached) into *both* of the two initrd
files on the USB stick

- /install.a64/initrd.gz and
- /install.a64/gtk/initrd.gz

cpio is an awful tool to use :-(. In each case:

$ cp /path/to/initrd.gz .
$ gunzip initrd.gz
$ echo preseed.cfg cpio -H newc -o -A -F initrd

$ gzip -9v initrd

$ cp initrd.gz /path/to/initrd.gz

If you look at the preseed file, it will do a few things:

- Use an early_command to unmount /media (to work around Debian bug
#1051964)

- Register a late_command call for /cdrom/finish-rpi (the next
file - see below) to run at the end of the installation.

- Force grub installation also to the EFI removable media path,
needed as the rpi doesn't store EFI boot variables.

- Stop the installer asking for firmware from removable media (as
the rpi4 will ask for broadcom bluetooth fw that we can't
ship. Can be ignored safely.)

6. Copy the finish-rpi script (attached) into / on the USB stick. It
will be run at the end of the installation, triggered via the
preseed. It does a couple of things:

- Copy the edk2 firmware files into the ESP on the system that's
just been installer

- Remove shim-signed from the installed systems, as there's a bug
that causes it to fail on rpi4. I need to dig into this to see
what the issue is.

That's it! Run the installer as normal, all should Just Work (TM).

BlueTooth didn't quite work : raspberrypi-firmware didn't install until adding a symlink for boot/efi to /boot/firmware

20231127 - This may not be necessary because raspberrypi-firmware path has been fixed

Preseed.cfg
# The preseed file itself causes a problem - the installer medium is
# left mounted on /medis so things break in cdrom-detect. Let's see if
# we can fix that!
d-i preseed/early_command string umount /media true

# Run our command to do rpi setup before reboot
d-i preseed/late_command string /cdrom/finish-rpi

# Force grub installation to the RM path
grub-efi-arm64 grub2/force_efi_extra_removable boolean true

# Don't prompt for missing firmware from removable media,
# e.g. broadcom bluetooth on the rpi.
d-i hw-detect/load_firmware boolean false

Finish.rpi
!/bin/sh

set -x

grep -q -a RPI4 /sys/firmware/acpi/tables/CSRT
if [ $? -ne 0 ]; then
echo "Not running on a Pi 4, exit!"
exit 0
fi

# Copy the rpi4 firmware binaries onto the installed system.
# Assumes the installer media is mounted on /cdrom.
cp -vr /cdrom/rpi4/. /target/boot/efi/.

# shim-signed doesn't seem happy on rpi4, so remove it
mount --bind /sys /target/sys
mount --bind /proc /target/proc
mount --bind /dev /target/dev

in-target apt-get remove --purge --autoremove -y shim-signed


23 November 2023

Freexian Collaborators: Debian Contributions: Preparing for Python 3.12, /usr-merge updates, invalid PEP-440 versions, and more! (by Utkarsh Gupta)

Contributing to Debian is part of Freexian s mission. This article covers the latest achievements of Freexian and their collaborators. All of this is made possible by organizations subscribing to our Long Term Support contracts and consulting services.

urllib3 s old security patch by Stefano Rivera Stefano ran into a test-suite failure in a new Debian package (python-truststore), caused by Debian s patch to urllib3 from a decade ago, making it enable TLS verification by default (remember those days!). Some analysis confirmed that this patch isn t useful any more, and could be removed. While working on the package, Stefano investigated the scope of the urllib3 2.x transition. It looks ready to start, not many packages are affected.

Preparing for Python 3.12 in dh-python by Stefano Rivera We are preparing to start the Python 3.12 transition in Debian. Two of the upstream changes that are going to cause a lot of packages to break could be worked-around in dh-python, so we did:
  • Distutils is no longer shipped in the Python stdlib. Packages need to Build-Depend on python3-setuptools to get a (compatibility shim) distutils. Until that happens, dh-python will Depend on setuptools.
  • A failure to find any tests to execute will now make the unittest runner exit 5, like pytest does. This was our change, to test-suites that have failed to be automatically discovered. It will cause many packages to fail to build, so until they explicitly skip running test suites, dh-python will ignore these failures.

/usr-merge by Helmut Grohne It has become clear that the planned changes to debhelper and systemd.pc cause more rc-bugs. Helmut researched these systematically and filed another stack of patches. At the time of this writing, the uploads would still cause about 40 rc-bugs. A new opt-in helper dh_movetousr has been developed and added to debhelper in trixie and unstable.

debian-printing, by Thorsten Alteholz This month Thorsten adopted two packages, namely rlpr and lprng, and moved them to the debian-printing team. As part of this Thorsten could close eight bugs in the BTS. Thorsten also uploaded a new upstream version of cups, which also meant that eleven bugs could be closed. As package hannah-foo2zjs still depended on the deprecated policykit-1 package, Thorsten changed the dependency list accordingly and could close one RC bug by the following upload.

Invalid PEP-440 Versions in Python Packages by Stefano Rivera Stefano investigated how many packages in Debian (typically Debian-native packages) recorded versions in their packaging metadata (egg-info directories) that weren t valid PEP-440 Python versions. pip is starting to enforce that all versions on the system are valid.

Miscellaneous contributions
  • distro-info-data updates in Debian, due to the new Ubuntu release, by Stefano.
  • DebConf 23 bookkeeping continues, but is winding down. Stefano still spends a little time on it.
  • Utkarsh continues to monitor and help with reimbursements.
  • Helmut continues to maintain architecture bootstrap and accidentally broke pam briefly
  • Anton uploaded boost1.83 and started to prepare a transition to make boost1.83 as a default boost version.
  • Rejuntada Debian UY 2023, a MiniDebConf that will be held in Montevideo, from 9 to 11 November, mainly organized by Santiago.

21 November 2023

Mike Hommey: How I (kind of) killed Mercurial at Mozilla

Did you hear the news? Firefox development is moving from Mercurial to Git. While the decision is far from being mine, and I was barely involved in the small incremental changes that ultimately led to this decision, I feel I have to take at least some responsibility. And if you are one of those who would rather use Mercurial than Git, you may direct all your ire at me. But let's take a step back and review the past 25 years leading to this decision. You'll forgive me for skipping some details and any possible inaccuracies. This is already a long post, while I could have been more thorough, even I think that would have been too much. This is also not an official Mozilla position, only my personal perception and recollection as someone who was involved at times, but mostly an observer from a distance. From CVS to DVCS From its release in 1998, the Mozilla source code was kept in a CVS repository. If you're too young to know what CVS is, let's just say it's an old school version control system, with its set of problems. Back then, it was mostly ubiquitous in the Open Source world, as far as I remember. In the early 2000s, the Subversion version control system gained some traction, solving some of the problems that came with CVS. Incidentally, Subversion was created by Jim Blandy, who now works at Mozilla on completely unrelated matters. In the same period, the Linux kernel development moved from CVS to Bitkeeper, which was more suitable to the distributed nature of the Linux community. BitKeeper had its own problem, though: it was the opposite of Open Source, but for most pragmatic people, it wasn't a real concern because free access was provided. Until it became a problem: someone at OSDL developed an alternative client to BitKeeper, and licenses of BitKeeper were rescinded for OSDL members, including Linus Torvalds (they were even prohibited from purchasing one). Following this fiasco, in April 2005, two weeks from each other, both Git and Mercurial were born. The former was created by Linus Torvalds himself, while the latter was developed by Olivia Mackall, who was a Linux kernel developer back then. And because they both came out of the same community for the same needs, and the same shared experience with BitKeeper, they both were similar distributed version control systems. Interestingly enough, several other DVCSes existed: In this landscape, the major difference Git was making at the time was that it was blazing fast. Almost incredibly so, at least on Linux systems. That was less true on other platforms (especially Windows). It was a game-changer for handling large codebases in a smooth manner. Anyways, two years later, in 2007, Mozilla decided to move its source code not to Bzr, not to Git, not to Subversion (which, yes, was a contender), but to Mercurial. The decision "process" was laid down in two rather colorful blog posts. My memory is a bit fuzzy, but I don't recall that it was a particularly controversial choice. All of those DVCSes were still young, and there was no definite "winner" yet (GitHub hadn't even been founded). It made the most sense for Mozilla back then, mainly because the Git experience on Windows still wasn't there, and that mattered a lot for Mozilla, with its diverse platform support. As a contributor, I didn't think much of it, although to be fair, at the time, I was mostly consuming the source tarballs. Personal preferences Digging through my archives, I've unearthed a forgotten chapter: I did end up setting up both a Mercurial and a Git mirror of the Firefox source repository on alioth.debian.org. Alioth.debian.org was a FusionForge-based collaboration system for Debian developers, similar to SourceForge. It was the ancestor of salsa.debian.org. I used those mirrors for the Debian packaging of Firefox (cough cough Iceweasel). The Git mirror was created with hg-fast-export, and the Mercurial mirror was only a necessary step in the process. By that time, I had converted my Subversion repositories to Git, and switched off SVK. Incidentally, I started contributing to Git around that time as well. I apparently did this not too long after Mozilla switched to Mercurial. As a Linux user, I think I just wanted the speed that Mercurial was not providing. Not that Mercurial was that slow, but the difference between a couple seconds and a couple hundred milliseconds was a significant enough difference in user experience for me to prefer Git (and Firefox was not the only thing I was using version control for) Other people had also similarly created their own mirror, or with other tools. But none of them were "compatible": their commit hashes were different. Hg-git, used by the latter, was putting extra information in commit messages that would make the conversion differ, and hg-fast-export would just not be consistent with itself! My mirror is long gone, and those have not been updated in more than a decade. I did end up using Mercurial, when I got commit access to the Firefox source repository in April 2010. I still kept using Git for my Debian activities, but I now was also using Mercurial to push to the Mozilla servers. I joined Mozilla as a contractor a few months after that, and kept using Mercurial for a while, but as a, by then, long time Git user, it never really clicked for me. It turns out, the sentiment was shared by several at Mozilla. Git incursion In the early 2010s, GitHub was becoming ubiquitous, and the Git mindshare was getting large. Multiple projects at Mozilla were already entirely hosted on GitHub. As for the Firefox source code base, Mozilla back then was kind of a Wild West, and engineers being engineers, multiple people had been using Git, with their own inconvenient workflows involving a local Mercurial clone. The most popular set of scripts was moz-git-tools, to incorporate changes in a local Git repository into the local Mercurial copy, to then send to Mozilla servers. In terms of the number of people doing that, though, I don't think it was a lot of people, probably a few handfuls. On my end, I was still keeping up with Mercurial. I think at that time several engineers had their own unofficial Git mirrors on GitHub, and later on Ehsan Akhgari provided another mirror, with a twist: it also contained the full CVS history, which the canonical Mercurial repository didn't have. This was particularly interesting for engineers who needed to do some code archeology and couldn't get past the 2007 cutoff of the Mercurial repository. I think that mirror ultimately became the official-looking, but really unofficial, mozilla-central repository on GitHub. On a side note, a Mercurial repository containing the CVS history was also later set up, but that didn't lead to something officially supported on the Mercurial side. Some time around 2011~2012, I started to more seriously consider using Git for work myself, but wasn't satisfied with the workflows others had set up for themselves. I really didn't like the idea of wasting extra disk space keeping a Mercurial clone around while using a Git mirror. I wrote a Python script that would use Mercurial as a library to access a remote repository and produce a git-fast-import stream. That would allow the creation of a git repository without a local Mercurial clone. It worked quite well, but it was not able to incrementally update. Other, more complete tools existed already, some of which I mentioned above. But as time was passing and the size and depth of the Mercurial repository was growing, these tools were showing their limits and were too slow for my taste, especially for the initial clone. Boot to Git In the same time frame, Mozilla ventured in the Mobile OS sphere with Boot to Gecko, later known as Firefox OS. What does that have to do with version control? The needs of third party collaborators in the mobile space led to the creation of what is now the gecko-dev repository on GitHub. As I remember it, it was challenging to create, but once it was there, Git users could just clone it and have a working, up-to-date local copy of the Firefox source code and its history... which they could already have, but this was the first officially supported way of doing so. Coincidentally, Ehsan's unofficial mirror was having trouble (to the point of GitHub closing the repository) and was ultimately shut down in December 2013. You'll often find comments on the interwebs about how GitHub has become unreliable since the Microsoft acquisition. I can't really comment on that, but if you think GitHub is unreliable now, rest assured that it was worse in its beginning. And its sustainability as a platform also wasn't a given, being a rather new player. So on top of having this official mirror on GitHub, Mozilla also ventured in setting up its own Git server for greater control and reliability. But the canonical repository was still the Mercurial one, and while Git users now had a supported mirror to pull from, they still had to somehow interact with Mercurial repositories, most notably for the Try server. Git slowly creeping in Firefox build tooling Still in the same time frame, tooling around building Firefox was improving drastically. For obvious reasons, when version control integration was needed in the tooling, Mercurial support was always a no-brainer. The first explicit acknowledgement of a Git repository for the Firefox source code, other than the addition of the .gitignore file, was bug 774109. It added a script to install the prerequisites to build Firefox on macOS (still called OSX back then), and that would print a message inviting people to obtain a copy of the source code with either Mercurial or Git. That was a precursor to current bootstrap.py, from September 2012. Following that, as far as I can tell, the first real incursion of Git in the Firefox source tree tooling happened in bug 965120. A few days earlier, bug 952379 had added a mach clang-format command that would apply clang-format-diff to the output from hg diff. Obviously, running hg diff on a Git working tree didn't work, and bug 965120 was filed, and support for Git was added there. That was in January 2014. A year later, when the initial implementation of mach artifact was added (which ultimately led to artifact builds), Git users were an immediate thought. But while they were considered, it was not to support them, but to avoid actively breaking their workflows. Git support for mach artifact was eventually added 14 months later, in March 2016. From gecko-dev to git-cinnabar Let's step back a little here, back to the end of 2014. My user experience with Mercurial had reached a level of dissatisfaction that was enough for me to decide to take that script from a couple years prior and make it work for incremental updates. That meant finding a way to store enough information locally to be able to reconstruct whatever the incremental updates would be relying on (guess why other tools hid a local Mercurial clone under hood). I got something working rather quickly, and after talking to a few people about this side project at the Mozilla Portland All Hands and seeing their excitement, I published a git-remote-hg initial prototype on the last day of the All Hands. Within weeks, the prototype gained the ability to directly push to Mercurial repositories, and a couple months later, was renamed to git-cinnabar. At that point, as a Git user, instead of cloning the gecko-dev repository from GitHub and switching to a local Mercurial repository whenever you needed to push to a Mercurial repository (i.e. the aforementioned Try server, or, at the time, for reviews), you could just clone and push directly from/to Mercurial, all within Git. And it was fast too. You could get a full clone of mozilla-central in less than half an hour, when at the time, other similar tools would take more than 10 hours (needless to say, it's even worse now). Another couple months later (we're now at the end of April 2015), git-cinnabar became able to start off a local clone of the gecko-dev repository, rather than clone from scratch, which could be time consuming. But because git-cinnabar and the tool that was updating gecko-dev weren't producing the same commits, this setup was cumbersome and not really recommended. For instance, if you pushed something to mozilla-central with git-cinnabar from a gecko-dev clone, it would come back with a different commit hash in gecko-dev, and you'd have to deal with the divergence. Eventually, in April 2020, the scripts updating gecko-dev were switched to git-cinnabar, making the use of gecko-dev alongside git-cinnabar a more viable option. Ironically(?), the switch occurred to ease collaboration with KaiOS (you know, the mobile OS born from the ashes of Firefox OS). Well, okay, in all honesty, when the need of syncing in both directions between Git and Mercurial (we only had ever synced from Mercurial to Git) came up, I nudged Mozilla in the direction of git-cinnabar, which, in my (biased but still honest) opinion, was the more reliable option for two-way synchronization (we did have regular conversion problems with hg-git, nothing of the sort has happened since the switch). One Firefox repository to rule them all For reasons I don't know, Mozilla decided to use separate Mercurial repositories as "branches". With the switch to the rapid release process in 2011, that meant one repository for nightly (mozilla-central), one for aurora, one for beta, and one for release. And with the addition of Extended Support Releases in 2012, we now add a new ESR repository every year. Boot to Gecko also had its own branches, and so did Fennec (Firefox for Mobile, before Android). There are a lot of them. And then there are also integration branches, where developer's work lands before being merged in mozilla-central (or backed out if it breaks things), always leaving mozilla-central in a (hopefully) good state. Only one of them remains in use today, though. I can only suppose that the way Mercurial branches work was not deemed practical. It is worth noting, though, that Mercurial branches are used in some cases, to branch off a dot-release when the next major release process has already started, so it's not a matter of not knowing the feature exists or some such. In 2016, Gregory Szorc set up a new repository that would contain them all (or at least most of them), which eventually became what is now the mozilla-unified repository. This would e.g. simplify switching between branches when necessary. 7 years later, for some reason, the other "branches" still exist, but most developers are expected to be using mozilla-unified. Mozilla's CI also switched to using mozilla-unified as base repository. Honestly, I'm not sure why the separate repositories are still the main entry point for pushes, rather than going directly to mozilla-unified, but it probably comes down to switching being work, and not being a top priority. Also, it probably doesn't help that working with multiple heads in Mercurial, even (especially?) with bookmarks, can be a source of confusion. To give an example, if you aren't careful, and do a plain clone of the mozilla-unified repository, you may not end up on the latest mozilla-central changeset, but rather, e.g. one from beta, or some other branch, depending which one was last updated. Hosting is simple, right? Put your repository on a server, install hgweb or gitweb, and that's it? Maybe that works for... Mercurial itself, but that repository "only" has slightly over 50k changesets and less than 4k files. Mozilla-central has more than an order of magnitude more changesets (close to 700k) and two orders of magnitude more files (more than 700k if you count the deleted or moved files, 350k if you count the currently existing ones). And remember, there are a lot of "duplicates" of this repository. And I didn't even mention user repositories and project branches. Sure, it's a self-inflicted pain, and you'd think it could probably(?) be mitigated with shared repositories. But consider the simple case of two repositories: mozilla-central and autoland. You make autoland use mozilla-central as a shared repository. Now, you push something new to autoland, it's stored in the autoland datastore. Eventually, you merge to mozilla-central. Congratulations, it's now in both datastores, and you'd need to clean-up autoland if you wanted to avoid the duplication. Now, you'd think mozilla-unified would solve these issues, and it would... to some extent. Because that wouldn't cover user repositories and project branches briefly mentioned above, which in GitHub parlance would be considered as Forks. So you'd want a mega global datastore shared by all repositories, and repositories would need to only expose what they really contain. Does Mercurial support that? I don't think so (okay, I'll give you that: even if it doesn't, it could, but that's extra work). And since we're talking about a transition to Git, does Git support that? You may have read about how you can link to a commit from a fork and make-pretend that it comes from the main repository on GitHub? At least, it shows a warning, now. That's essentially the architectural reason why. So the actual answer is that Git doesn't support it out of the box, but GitHub has some backend magic to handle it somehow (and hopefully, other things like Gitea, Girocco, Gitlab, etc. have something similar). Now, to come back to the size of the repository. A repository is not a static file. It's a server with which you negotiate what you have against what it has that you want. Then the server bundles what you asked for based on what you said you have. Or in the opposite direction, you negotiate what you have that it doesn't, you send it, and the server incorporates what you sent it. Fortunately the latter is less frequent and requires authentication. But the former is more frequent and CPU intensive. Especially when pulling a large number of changesets, which, incidentally, cloning is. "But there is a solution for clones" you might say, which is true. That's clonebundles, which offload the CPU intensive part of cloning to a single job scheduled regularly. Guess who implemented it? Mozilla. But that only covers the cloning part. We actually had laid the ground to support offloading large incremental updates and split clones, but that never materialized. Even with all that, that still leaves you with a server that can display file contents, diffs, blames, provide zip archives of a revision, and more, all of which are CPU intensive in their own way. And these endpoints are regularly abused, and cause extra load to your servers, yes plural, because of course a single server won't handle the load for the number of users of your big repositories. And because your endpoints are abused, you have to close some of them. And I'm not mentioning the Try repository with its tens of thousands of heads, which brings its own sets of problems (and it would have even more heads if we didn't fake-merge them once in a while). Of course, all the above applies to Git (and it only gained support for something akin to clonebundles last year). So, when the Firefox OS project was stopped, there wasn't much motivation to continue supporting our own Git server, Mercurial still being the official point of entry, and git.mozilla.org was shut down in 2016. The growing difficulty of maintaining the status quo Slowly, but steadily in more recent years, as new tooling was added that needed some input from the source code manager, support for Git was more and more consistently added. But at the same time, as people left for other endeavors and weren't necessarily replaced, or more recently with layoffs, resources allocated to such tooling have been spread thin. Meanwhile, the repository growth didn't take a break, and the Try repository was becoming an increasing pain, with push times quite often exceeding 10 minutes. The ongoing work to move Try pushes to Lando will hide the problem under the rug, but the underlying problem will still exist (although the last version of Mercurial seems to have improved things). On the flip side, more and more people have been relying on Git for Firefox development, to my own surprise, as I didn't really push for that to happen. It just happened organically, by ways of git-cinnabar existing, providing a compelling experience to those who prefer Git, and, I guess, word of mouth. I was genuinely surprised when I recently heard the use of Git among moz-phab users had surpassed a third. I did, however, occasionally orient people who struggled with Mercurial and said they were more familiar with Git, towards git-cinnabar. I suspect there's a somewhat large number of people who never realized Git was a viable option. But that, on its own, can come with its own challenges: if you use git-cinnabar without being backed by gecko-dev, you'll have a hard time sharing your branches on GitHub, because you can't push to a fork of gecko-dev without pushing your entire local repository, as they have different commit histories. And switching to gecko-dev when you weren't already using it requires some extra work to rebase all your local branches from the old commit history to the new one. Clone times with git-cinnabar have also started to go a little out of hand in the past few years, but this was mitigated in a similar manner as with the Mercurial cloning problem: with static files that are refreshed regularly. Ironically, that made cloning with git-cinnabar faster than cloning with Mercurial. But generating those static files is increasingly time-consuming. As of writing, generating those for mozilla-unified takes close to 7 hours. I was predicting clone times over 10 hours "in 5 years" in a post from 4 years ago, I wasn't too far off. With exponential growth, it could still happen, although to be fair, CPUs have improved since. I will explore the performance aspect in a subsequent blog post, alongside the upcoming release of git-cinnabar 0.7.0-b1. I don't even want to check how long it now takes with hg-git or git-remote-hg (they were already taking more than a day when git-cinnabar was taking a couple hours). I suppose it's about time that I clarify that git-cinnabar has always been a side-project. It hasn't been part of my duties at Mozilla, and the extent to which Mozilla supports git-cinnabar is in the form of taskcluster workers on the community instance for both git-cinnabar CI and generating those clone bundles. Consequently, that makes the above git-cinnabar specific issues a Me problem, rather than a Mozilla problem. Taking the leap I can't talk for the people who made the proposal to move to Git, nor for the people who put a green light on it. But I can at least give my perspective. Developers have regularly asked why Mozilla was still using Mercurial, but I think it was the first time that a formal proposal was laid out. And it came from the Engineering Workflow team, responsible for issue tracking, code reviews, source control, build and more. It's easy to say "Mozilla should have chosen Git in the first place", but back in 2007, GitHub wasn't there, Bitbucket wasn't there, and all the available options were rather new (especially compared to the then 21 years-old CVS). I think Mozilla made the right choice, all things considered. Had they waited a couple years, the story might have been different. You might say that Mozilla stayed with Mercurial for so long because of the sunk cost fallacy. I don't think that's true either. But after the biggest Mercurial repository hosting service turned off Mercurial support, and the main contributor to Mercurial going their own way, it's hard to ignore that the landscape has evolved. And the problems that we regularly encounter with the Mercurial servers are not going to get any better as the repository continues to grow. As far as I know, all the Mercurial repositories bigger than Mozilla's are... not using Mercurial. Google has its own closed-source server, and Facebook has another of its own, and it's not really public either. With resources spread thin, I don't expect Mozilla to be able to continue supporting a Mercurial server indefinitely (although I guess Octobus could be contracted to give a hand, but is that sustainable?). Mozilla, being a champion of Open Source, also doesn't live in a silo. At some point, you have to meet your contributors where they are. And the Open Source world is now majoritarily using Git. I'm sure the vast majority of new hires at Mozilla in the past, say, 5 years, know Git and have had to learn Mercurial (although they arguably didn't need to). Even within Mozilla, with thousands(!) of repositories on GitHub, Firefox is now actually the exception rather than the norm. I should even actually say Desktop Firefox, because even Mobile Firefox lives on GitHub (although Fenix is moving back in together with Desktop Firefox, and the timing is such that that will probably happen before Firefox moves to Git). Heck, even Microsoft moved to Git! With a significant developer base already using Git thanks to git-cinnabar, and all the constraints and problems I mentioned previously, it actually seems natural that a transition (finally) happens. However, had git-cinnabar or something similarly viable not existed, I don't think Mozilla would be in a position to take this decision. On one hand, it probably wouldn't be in the current situation of having to support both Git and Mercurial in the tooling around Firefox, nor the resource constraints related to that. But on the other hand, it would be farther from supporting Git and being able to make the switch in order to address all the other problems. But... GitHub? I hope I made a compelling case that hosting is not as simple as it can seem, at the scale of the Firefox repository. It's also not Mozilla's main focus. Mozilla has enough on its plate with the migration of existing infrastructure that does rely on Mercurial to understandably not want to figure out the hosting part, especially with limited resources, and with the mixed experience hosting both Mercurial and git has been so far. After all, GitHub couldn't even display things like the contributors' graph on gecko-dev until recently, and hosting is literally their job! They still drop the ball on large blames (thankfully we have searchfox for those). Where does that leave us? Gitlab? For those criticizing GitHub for being proprietary, that's probably not open enough. Cloud Source Repositories? "But GitHub is Microsoft" is a complaint I've read a lot after the announcement. Do you think Google hosting would have appealed to these people? Bitbucket? I'm kind of surprised it wasn't in the list of providers that were considered, but I'm also kind of glad it wasn't (and I'll leave it at that). I think the only relatively big hosting provider that could have made the people criticizing the choice of GitHub happy is Codeberg, but I hadn't even heard of it before it was mentioned in response to Mozilla's announcement. But really, with literal thousands of Mozilla repositories already on GitHub, with literal tens of millions repositories on the platform overall, the pragmatic in me can't deny that it's an attractive option (and I can't stress enough that I wasn't remotely close to the room where the discussion about what choice to make happened). "But it's a slippery slope". I can see that being a real concern. LLVM also moved its repository to GitHub (from a (I think) self-hosted Subversion server), and ended up moving off Bugzilla and Phabricator to GitHub issues and PRs four years later. As an occasional contributor to LLVM, I hate this move. I hate the GitHub review UI with a passion. At least, right now, GitHub PRs are not a viable option for Mozilla, for their lack of support for security related PRs, and the more general shortcomings in the review UI. That doesn't mean things won't change in the future, but let's not get too far ahead of ourselves. The move to Git has just been announced, and the migration has not even begun yet. Just because Mozilla is moving the Firefox repository to GitHub doesn't mean it's locked in forever or that all the eggs are going to be thrown into one basket. If bridges need to be crossed in the future, we'll see then. So, what's next? The official announcement said we're not expecting the migration to really begin until six months from now. I'll swim against the current here, and say this: the earlier you can switch to git, the earlier you'll find out what works and what doesn't work for you, whether you already know Git or not. While there is not one unique workflow, here's what I would recommend anyone who wants to take the leap off Mercurial right now: As there is no one-size-fits-all workflow, I won't tell you how to organize yourself from there. I'll just say this: if you know the Mercurial sha1s of your previous local work, you can create branches for them with:
$ git branch <branch_name> $(git cinnabar hg2git <hg_sha1>)
At this point, you should have everything available on the Git side, and you can remove the .hg directory. Or move it into some empty directory somewhere else, just in case. But don't leave it here, it will only confuse the tooling. Artifact builds WILL be confused, though, and you'll have to ./mach configure before being able to do anything. You may also hit bug 1865299 if your working tree is older than this post. If you have any problem or question, you can ping me on #git-cinnabar or #git on Matrix. I'll put the instructions above somewhere on wiki.mozilla.org, and we can collaboratively iterate on them. Now, what the announcement didn't say is that the Git repository WILL NOT be gecko-dev, doesn't exist yet, and WON'T BE COMPATIBLE (trust me, it'll be for the better). Why did I make you do all the above, you ask? Because that won't be a problem. I'll have you covered, I promise. The upcoming release of git-cinnabar 0.7.0-b1 will have a way to smoothly switch between gecko-dev and the future repository (incidentally, that will also allow to switch from a pure git-cinnabar clone to a gecko-dev one, for the git-cinnabar users who have kept reading this far). What about git-cinnabar? With Mercurial going the way of the dodo at Mozilla, my own need for git-cinnabar will vanish. Legitimately, this begs the question whether it will still be maintained. I can't answer for sure. I don't have a crystal ball. However, the needs of the transition itself will motivate me to finish some long-standing things (like finalizing the support for pushing merges, which is currently behind an experimental flag) or implement some missing features (support for creating Mercurial branches). Git-cinnabar started as a Python script, it grew a sidekick implemented in C, which then incorporated some Rust, which then cannibalized the Python script and took its place. It is now close to 90% Rust, and 10% C (if you don't count the code from Git that is statically linked to it), and has sort of become my Rust playground (it's also, I must admit, a mess, because of its history, but it's getting better). So the day to day use with Mercurial is not my sole motivation to keep developing it. If it were, it would stay stagnant, because all the features I need are there, and the speed is not all that bad, although I know it could be better. Arguably, though, git-cinnabar has been relatively stagnant feature-wise, because all the features I need are there. So, no, I don't expect git-cinnabar to die along Mercurial use at Mozilla, but I can't really promise anything either. Final words That was a long post. But there was a lot of ground to cover. And I still skipped over a bunch of things. I hope I didn't bore you to death. If I did and you're still reading... what's wrong with you? ;) So this is the end of Mercurial at Mozilla. So long, and thanks for all the fish. But this is also the beginning of a transition that is not easy, and that will not be without hiccups, I'm sure. So fasten your seatbelts (plural), and welcome the change. To circle back to the clickbait title, did I really kill Mercurial at Mozilla? Of course not. But it's like I stumbled upon a few sparks and tossed a can of gasoline on them. I didn't start the fire, but I sure made it into a proper bonfire... and now it has turned into a wildfire. And who knows? 15 years from now, someone else might be looking back at how Mozilla picked Git at the wrong time, and that, had we waited a little longer, we would have picked some yet to come new horse. But hey, that's the tech cycle for you.

12 November 2023

Lukas M rdian: Netplan brings consistent network configuration across Desktop, Server, Cloud and IoT

Ubuntu 23.10 Mantic Minotaur Desktop, showing network settings We released Ubuntu 23.10 Mantic Minotaur on 12 October 2023, shipping its proven and trusted network stack based on Netplan. Netplan is the default tool to configure Linux networking on Ubuntu since 2016. In the past, it was primarily used to control the Server and Cloud variants of Ubuntu, while on Desktop systems it would hand over control to NetworkManager. In Ubuntu 23.10 this disparity in how to control the network stack on different Ubuntu platforms was closed by integrating NetworkManager with the underlying Netplan stack. Netplan could already be used to describe network connections on Desktop systems managed by NetworkManager. But network connections created or modified through NetworkManager would not be known to Netplan, so it was a one-way street. Activating the bidirectional NetworkManager-Netplan integration allows for any configuration change made through NetworkManager to be propagated back into Netplan. Changes made in Netplan itself will still be visible in NetworkManager, as before. This way, Netplan can be considered the single source of truth for network configuration across all variants of Ubuntu, with the network configuration stored in /etc/netplan/, using Netplan s common and declarative YAML format.

Netplan Desktop integration On workstations, the most common scenario is for users to configure networking through NetworkManager s graphical interface, instead of driving it through Netplan s declarative YAML files. Netplan ships a libnetplan library that provides an API to access Netplan s parser and validation internals, which is now used by NetworkManager to store any network interface configuration changes in Netplan. For instance, network configuration defined through NetworkManager s graphical UI or D-Bus API will be exported to Netplan s native YAML format in the common location at /etc/netplan/. This way, the only thing administrators need to care about when managing a fleet of Desktop installations is Netplan. Furthermore, programmatic access to all network configuration is now easily accessible to other system components integrating with Netplan, such as snapd. This solution has already been used in more confined environments, such as Ubuntu Core and is now enabled by default on Ubuntu 23.10 Desktop.

Migration of existing connection profiles On installation of the NetworkManager package (network-manager >= 1.44.2-1ubuntu1) in Ubuntu 23.10, all your existing connection profiles from /etc/NetworkManager/system-connections/ will automatically and transparently be migrated to Netplan s declarative YAML format and stored in its common configuration directory /etc/netplan/. The same migration will happen in the background whenever you add or modify any connection profile through the NetworkManager user interface, integrated with GNOME Shell. From this point on, Netplan will be aware of your entire network configuration and you can query it using its CLI tools, such as sudo netplan get or sudo netplan status without interrupting traditional NetworkManager workflows (UI, nmcli, nmtui, D-Bus APIs). You can observe this migration on the apt-get command line, watching out for logs like the following:
Setting up network-manager (1.44.2-1ubuntu1.1) ...
Migrating HomeNet (9d087126-ae71-4992-9e0a-18c5ea92a4ed) to /etc/netplan
Migrating eduroam (37d643bb-d81d-4186-9402-7b47632c59b1) to /etc/netplan
Migrating DebConf (f862be9c-fb06-4c0f-862f-c8e210ca4941) to /etc/netplan
In order to prepare for a smooth transition, NetworkManager tests were integrated into Netplan s continuous integration pipeline at the upstream GitHub repository. Furthermore, we implemented a passthrough method of handling unknown or new settings that cannot yet be fully covered by Netplan, making Netplan future-proof for any upcoming NetworkManager release.

The future of Netplan Netplan has established itself as the proven network stack across all variants of Ubuntu Desktop, Server, Cloud, or Embedded. It has been the default stack across many Ubuntu LTS releases, serving millions of users over the years. With the bidirectional integration between NetworkManager and Netplan the final piece of the puzzle is implemented to consider Netplan the single source of truth for network configuration on Ubuntu. With Debian choosing Netplan to be the default network stack for their cloud images, it is also gaining traction outside the Ubuntu ecosystem and growing into the wider open source community. Within the development cycle for Ubuntu 24.04 LTS, we will polish the Netplan codebase to be ready for a 1.0 release, coming with certain guarantees on API and ABI stability, so that other distributions and 3rd party integrations can rely on Netplan s interfaces. First steps into that direction have already been taken, as the Netplan team reached out to the Debian community at DebConf 2023 in Kochi/India to evaluate possible synergies.

Conclusion Netplan can be used transparently to control a workstation s network configuration and plays hand-in-hand with many desktop environments through its tight integration with NetworkManager. It allows for easy network monitoring, using common graphical interfaces and provides a single source of truth to network administrators, allowing for configuration of Ubuntu Desktop fleets in a streamlined and declarative way. You can try this new functionality hands-on by following the Access Desktop NetworkManager settings through Netplan tutorial.
If you want to learn more, feel free to follow our activities on Netplan.io, GitHub, Launchpad, IRC or our Netplan Developer Diaries blog on discourse.

7 November 2023

Matthew Palmer: PostgreSQL Encryption: The Available Options

On an episode of Postgres FM, the hosts had a (very brief) discussion of data encryption in PostgreSQL. While Postgres FM is a podcast well worth a subscribe, the hosts aren t data security experts, and so as someone who builds a queryable database encryption system, I found the coverage to be somewhat lacking. I figured I d provide a more complete survey of the available options for PostgreSQL-related data encryption.

The Status Quo By default, when you install PostgreSQL, there is no data encryption at all. That means that anyone who gets access to any part of the system can read all the data they have access to. This is, of course, not peculiar to PostgreSQL: basically everything works much the same way. What s stopping an attacker from nicking off with all your data is the fact that they can t access the database at all. The things that are acting as protection are perimeter defences, like putting the physical equipment running the server in a secure datacenter, firewalls to prevent internet randos connecting to the database, and strong passwords. This is referred to as tortoise security it s tough on the outside, but soft on the inside. Once that outer shell is cracked, the delicious, delicious data is ripe for the picking, and there s absolutely nothing to stop a miscreant from going to town and making off with everything. It s a good idea to plan your defenses on the assumption you re going to get breached sooner or later. Having good defence-in-depth includes denying the attacker to your data even if they compromise the database. This is where encryption comes in.

Storage-Layer Defences: Disk / Volume Encryption To protect against the compromise of the storage that your database uses (physical disks, EBS volumes, and the like), it s common to employ encryption-at-rest, such as full-disk encryption, or volume encryption. These mechanisms protect against offline attacks, but provide no protection while the system is actually running. And therein lies the rub: your database is always running, so encryption at rest typically doesn t provide much value. If you re running physical systems, disk encryption is essential, but more to prevent accidental data loss, due to things like failing to wipe drives before disposing of them, rather than physical theft. In systems where volume encryption is only a tickbox away, it s also worth enabling, if only to prevent inane questions from your security auditors. Relying solely on storage-layer defences, though, is very unlikely to provide any appreciable value in preventing data loss.

Database-Layer Defences: Transparent Database Encryption If you ve used proprietary database systems in high-security environments, you might have come across Transparent Database Encryption (TDE). There are also a couple of proprietary extensions for PostgreSQL that provide this functionality. TDE is essentially encryption-at-rest implemented inside the database server. As such, it has much the same drawbacks as disk encryption: few real-world attacks are thwarted by it. There is a very small amount of additional protection, in that physical level backups (as produced by pg_basebackup) are protected, but the vast majority of attacks aren t stopped by TDE. Any attacker who can access the database while it s running can just ask for an SQL-level dump of the stored data, and they ll get the unencrypted data quick as you like.

Application-Layer Defences: Field Encryption If you want to take the database out of the threat landscape, you really need to encrypt sensitive data before it even gets near the database. This is the realm of field encryption, more commonly known as application-level encryption. This technique involves encrypting each field of data before it is sent to be stored in the database, and then decrypting it again after it s retrieved from the database. Anyone who gets the data from the database directly, whether via a backup or a direct connection, is out of luck: they can t decrypt the data, and therefore it s worthless. There are, of course, some limitations of this technique. For starters, every ORM and data mapper out there has rolled their own encryption format, meaning that there s basically zero interoperability. This isn t a problem if you build everything that accesses the database using a single framework, but if you ever feel the need to migrate, or use the database from multiple codebases, you re likely in for a rough time. The other big problem of traditional application-level encryption is that, when the database can t understand what data its storing, it can t run queries against that data. So if you want to encrypt, say, your users dates of birth, but you also need to be able to query on that field, you need to choose between one or the other: you can t have both at the same time. You may think to yourself, but this isn t any good, an attacker that breaks into my application can still steal all my data! . That is true, but security is never binary. The name of the game is reducing the attack surface, making it harder for an attacker to succeed. If you leave all the data unencrypted in the database, an attacker can steal all your data by breaking into the database or by breaking into the application. Encrypting the data reduces the attacker s options, and allows you to focus your resources on hardening the application against attack, safe in the knowledge that an attacker who gets into the database directly isn t going to get anything valuable.

Sidenote: The Curious Case of pg_crypto PostgreSQL ships a contrib module called pg_crypto, which provides encryption and decryption functions. This sounds ideal to use for encrypting data within our applications, as it s available no matter what we re using to write our application. It avoids the problem of framework-specific cryptography, because you call the same PostgreSQL functions no matter what language you re using, which produces the same output. However, I don t recommend ever using pg_crypto s data encryption functions, and I doubt you will find many other cryptographic engineers who will, either. First up, and most horrifyingly, it requires you to pass the long-term keys to the database server. If there s an attacker actively in the database server, they can capture the keys as they come in, which means all the data encrypted using that key is exposed. Sending the keys can also result in the keys ending up in query logs, both on the client and server, which is obviously a terrible result. Less scary, but still very concerning, is that pg_crypto s available cryptography is, to put it mildly, antiquated. We have a lot of newer, safer, and faster techniques for data encryption, that aren t available in pg_crypto. This means that if you do use it, you re leaving a lot on the table, and need to have skilled cryptographic engineers on hand to avoid the potential pitfalls. In short: friends don t let friends use pg_crypto.

The Future: Enquo All this brings us to the project I run: Enquo. It takes application-layer encryption to a new level, by providing a language- and framework-agnostic cryptosystem that also enables encrypted data to be efficiently queried by the database. So, you can encrypt your users dates of birth, in such a way that anyone with the appropriate keys can query the database to return, say, all users over the age of 18, but an attacker just sees unintelligible gibberish. This should greatly increase the amount of data that can be encrypted, and as the Enquo project expands its available data types and supported languages, the coverage of encrypted data will grow and grow. My eventual goal is to encrypt all data, all the time. If this appeals to you, visit enquo.org to use or contribute to the open source project, or EnquoDB.com for commercial support and hosted database options.

5 November 2023

Vincent Bernat: Non-interactive SSH password authentication

SSH offers several forms of authentication, such as passwords and public keys. The latter are considered more secure. However, password authentication remains prevalent, particularly with network equipment.1 A classic solution to avoid typing a password for each connection is sshpass, or its more correct variant passh. Here is a wrapper for Zsh, getting the password from pass, a simple password manager:2
pssh()  
  passh -p <(pass show network/ssh/password   head -1) ssh "$@"
 
compdef pssh=ssh
This approach is a bit brittle as it requires to parse the output of the ssh command to look for a password prompt. Moreover, if no password is required, the password manager is still invoked. Since OpenSSH 8.4, we can use SSH_ASKPASS and SSH_ASKPASS_REQUIRE instead:
ssh()  
  set -o localoptions -o localtraps
  local passname=network/ssh/password
  local helper=$(mktemp)
  trap "command rm -f $helper" EXIT INT
  > $helper <<EOF
#!$SHELL
pass show $passname   head -1
EOF
  chmod u+x $helper
  SSH_ASKPASS=$helper SSH_ASKPASS_REQUIRE=force command ssh "$@"
 
If the password is incorrect, we can display a prompt on the second tentative:
ssh()  
  set -o localoptions -o localtraps
  local passname=network/ssh/password
  local helper=$(mktemp)
  trap "command rm -f $helper" EXIT INT
  > $helper <<EOF
#!$SHELL
if [ -k $helper ]; then
   
    oldtty=\$(stty -g)
    trap 'stty \$oldtty < /dev/tty 2> /dev/null' EXIT INT TERM HUP
    stty -echo
    print "\rpassword: "
    read password
    printf "\n"
    > /dev/tty < /dev/tty
  printf "%s" "\$password"
else
  pass show $passname   head -1
  chmod +t $helper
fi
EOF
  chmod u+x $helper
  SSH_ASKPASS=$helper SSH_ASKPASS_REQUIRE=force command ssh "$@"
 
A possible improvement is to use a different password entry depending on the remote host:3
ssh()  
  # Grab login information
  local -A details
  details=($ =$ (M)$ :-"$ (@f)$(command ssh -G "$@" 2>/dev/null) " :#(host hostname user) * )
  local remote=$ details[host]:-details[hostname] 
  local login=$ details[user] @$ remote 
  # Get password name
  local passname
  case "$login" in
    admin@*.example.net)  passname=company1/ssh/admin ;;
    bernat@*.example.net) passname=company1/ssh/bernat ;;
    backup@*.example.net) passname=company1/ssh/backup ;;
  esac
  # No password name? Just use regular SSH
  [[ -z $passname ]] &&  
    command ssh "$@"
    return $?
   
  # Invoke SSH with the helper for SSH_ASKPASS
  # [ ]
 
It is also possible to make scp invoke our custom ssh function:
scp()  
  set -o localoptions -o localtraps
  local helper=$(mktemp)
  trap "command rm -f $helper" EXIT INT
  > $helper <<EOF 
#!$SHELL
source $ (%):-%x 
ssh "\$@"
EOF
  command scp -S $helper "$@"
 
For the complete code, have a look at my zshrc. As an alternative, you can put the ssh() function body into its own script file and replace command ssh with /usr/bin/ssh to avoid an unwanted recursive call. In this case, the scp() function is not needed anymore.

  1. First, some vendors make it difficult to associate an SSH key with a user. Then, many vendors do not support certificate-based authentication, making it difficult to scale. Finally, interactions between public-key authentication and finer-grained authorization methods like TACACS+ and Radius are still uncharted territory.
  2. The clear-text password never appears on the command line, in the environment, or on the disk, making it difficult for a third party without elevated privileges to capture it. On Linux, Zsh provides the password through a file descriptor.
  3. To decipher the fourth line, you may get help from print -l and the zshexpn(1) manual page. details is an associative array defined from an array alternating keys and values.

3 November 2023

Scarlett Gately Moore: KDE: Big fixes for Snaps! Debian and KDE neon updates.

KDE Snap Marble
A big thank you goes to my parents this week for contributing to my survival fund. With that I was able to make a big push on fixing some outstanding issues on some of our snaps.
KDE neon: No major blowups this week. Worked out issues with kmail-account-wizard thanks to David R! This is now in the hands of upstream ( porting not complete ) Worked on more orange -> green packaging fixes. Debian: Fixed bug https://bugs.debian.org/cgi-bin/bugreport.cgi?bug=1054713 in squashfuse Thanks for stopping by. Please help fund my efforts! <noscript><a href="https://liberapay.com/sgmoore/donate"><img alt="Donate using Liberapay" src="https://liberapay.com/assets/widgets/donate.svg" /></a></noscript> Donate https://gofund.me/b8b69e54

1 November 2023

Matthew Garrett: Why ACPI?

"Why does ACPI exist" - - the greatest thread in the history of forums, locked by a moderator after 12,239 pages of heated debate, wait no let me start again.

Why does ACPI exist? In the beforetimes power management on x86 was done by jumping to an opaque BIOS entry point and hoping it would do the right thing. It frequently didn't. We called this Advanced Power Management (Advanced because before this power management involved custom drivers for every machine and everyone agreed that this was a bad idea), and it involved the firmware having to save and restore the state of every piece of hardware in the system. This meant that assumptions about hardware configuration were baked into the firmware - failed to program your graphics card exactly the way the BIOS expected? Hurrah! It's only saved and restored a subset of the state that you configured and now potential data corruption for you. The developers of ACPI made the reasonable decision that, well, maybe since the OS was the one setting state in the first place, the OS should restore it.

So far so good. But some state is fundamentally device specific, at a level that the OS generally ignores. How should this state be managed? One way to do that would be to have the OS know about the device specific details. Unfortunately that means you can't ship the computer without having OS support for it, which means having OS support for every device (exactly what we'd got away from with APM). This, uh, was not an option the PC industry seriously considered. The alternative is that you ship something that abstracts the details of the specific hardware and makes that abstraction available to the OS. This is what ACPI does, and it's also what things like Device Tree do. Both provide static information about how the platform is configured, which can then be consumed by the OS and avoid needing device-specific drivers or configuration to be built-in.

The main distinction between Device Tree and ACPI is that Device Tree is purely a description of the hardware that exists, and so still requires the OS to know what's possible - if you add a new type of power controller, for instance, you need to add a driver for that to the OS before you can express that via Device Tree. ACPI decided to include an interpreted language to allow vendors to expose functionality to the OS without the OS needing to know about the underlying hardware. So, for instance, ACPI allows you to associate a device with a function to power down that device. That function may, when executed, trigger a bunch of register accesses to a piece of hardware otherwise not exposed to the OS, and that hardware may then cut the power rail to the device to power it down entirely. And that can be done without the OS having to know anything about the control hardware.

How is this better than just calling into the firmware to do it? Because the fact that ACPI declares that it's going to access these registers means the OS can figure out that it shouldn't, because it might otherwise collide with what the firmware is doing. With APM we had no visibility into that - if the OS tried to touch the hardware at the same time APM did, boom, almost impossible to debug failures (This is why various hardware monitoring drivers refuse to load by default on Linux - the firmware declares that it's going to touch those registers itself, so Linux decides not to in order to avoid race conditions and potential hardware damage. In many cases the firmware offers a collaborative interface to obtain the same data, and a driver can be written to get that. this bug comment discusses this for a specific board)

Unfortunately ACPI doesn't entirely remove opaque firmware from the equation - ACPI methods can still trigger System Management Mode, which is basically a fancy way to say "Your computer stops running your OS, does something else for a while, and you have no idea what". This has all the same issues that APM did, in that if the hardware isn't in exactly the state the firmware expects, bad things can happen. While historically there were a bunch of ACPI-related issues because the spec didn't define every single possible scenario and also there was no conformance suite (eg, should the interpreter be multi-threaded? Not defined by spec, but influences whether a specific implementation will work or not!), these days overall compatibility is pretty solid and the vast majority of systems work just fine - but we do still have some issues that are largely associated with System Management Mode.

One example is a recent Lenovo one, where the firmware appears to try to poke the NVME drive on resume. There's some indication that this is intended to deal with transparently unlocking self-encrypting drives on resume, but it seems to do so without taking IOMMU configuration into account and so things explode. It's kind of understandable why a vendor would implement something like this, but it's also kind of understandable that doing so without OS cooperation may end badly.

This isn't something that ACPI enabled - in the absence of ACPI firmware vendors would just be doing this unilaterally with even less OS involvement and we'd probably have even more of these issues. Ideally we'd "simply" have hardware that didn't support transitioning back to opaque code, but we don't (ARM has basically the same issue with TrustZone). In the absence of the ideal world, by and large ACPI has been a net improvement in Linux compatibility on x86 systems. It certainly didn't remove the "Everything is Windows" mentality that many vendors have, but it meant we largely only needed to ensure that Linux behaved the same way as Windows in a finite number of ways (ie, the behaviour of the ACPI interpreter) rather than in every single hardware driver, and so the chances that a new machine will work out of the box are much greater than they were in the pre-ACPI period.

There's an alternative universe where we decided to teach the kernel about every piece of hardware it should run on. Fortunately (or, well, unfortunately) we've seen that in the ARM world. Most device-specific simply never reaches mainline, and most users are stuck running ancient kernels as a result. Imagine every x86 device vendor shipping their own kernel optimised for their hardware, and now imagine how well that works out given the quality of their firmware. Does that really seem better to you?

It's understandable why ACPI has a poor reputation. But it's also hard to figure out what would work better in the real world. We could have built something similar on top of Open Firmware instead but the distinction wouldn't be terribly meaningful - we'd just have Forth instead of the ACPI bytecode language. Longing for a non-ACPI world without presenting something that's better and actually stands a reasonable chance of adoption doesn't make the world a better place.

comment count unavailable comments

Next.

Previous.